Epson PowerLite 5600p User Manual - Page 85
Connecting to an External Audio System, Connecting to Additional Equipment, EMP Link V User, s Guide
 |
View all Epson PowerLite 5600p manuals
Add to My Manuals
Save this manual to your list of manuals |
Page 85 highlights
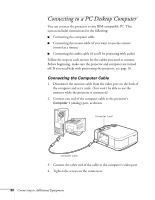
To install EMP Link V, insert the Projector Software CD-ROM in your CD-ROM drive and follow the instructions on the screen. The installation program also installs the EMP Link V User's Guide on your hard disk. You can access this manual in the EMP Link V folder for complete instructions on using the program. Connecting to an External Audio System The projector's internal speakers are loud enough for most rooms. However, if your installation requires maximum volume and sound quality, you can connect the projector to external speakers or a public address (PA) system. This disables the projector's internal speakers. If you've connected multiple audio and video sources to the projector, the projector will automatically switch the audio along with the video source whenever you choose a different video source. (See "Switching Between Picture Sources" on page 29 or page 34.) To connect the projector to an external sound system, you will need an RCA-to-3.5 mm stereo audio cable, which may be included with your sound system, or may be purchased from an electronics store. Before you start, make sure the projector and speakers or PA system are turned off. 1. Connect the cable's 3.5-mm stereo miniplug to the projector's Audio Out jack. audio cable 2. Connect the RCA plugs on the opposite end of the cable to the left and right jacks of your speaker or PA system. Connecting to Additional Equipment 79
-
 1
1 -
2
-
3
-
4
-
5
-
6
-
7
-
8
-
9
-
10
-
11
-
12
-
13
-
14
-
15
-
16
-
17
-
18
-
19
-
20
-
21
-
22
-
23
-
24
-
25
-
26
-
27
-
28
-
29
-
30
-
31
-
32
-
33
-
34
-
35
-
36
-
37
-
38
-
39
-
40
-
41
-
42
-
43
-
44
-
45
-
46
-
47
-
48
-
49
-
50
-
51
-
52
-
53
-
54
-
55
-
56
-
57
-
58
-
59
-
60
-
61
-
62
-
63
-
64
-
65
-
66
-
67
-
68
-
69
-
70
-
71
-
72
-
73
-
74
-
75
-
76
-
77
-
78
-
79
-
 80
80 -
 81
81 -
 82
82 -
 83
83 -
 84
84 -
 85
85 -
 86
86 -
 87
87 -
 88
88 -
 89
89 -
 90
90 -
91
-
92
-
93
-
94
-
95
-
96
-
97
-
98
-
99
-
100
-
101
-
102
-
103
-
104
-
105
-
106
-
107
-
108
-
109
-
110
-
111
-
112
-
113
-
114
 |
 |
