Epson PowerLite 73c User Manual - Page 24
Connecting a Component Video Cable, Input Signal
 |
View all Epson PowerLite 73c manuals
Add to My Manuals
Save this manual to your list of manuals |
Page 24 highlights
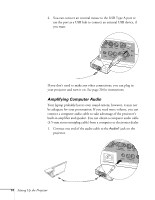
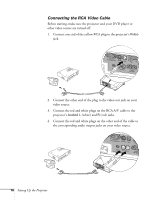
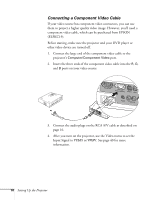
Connecting a Component Video Cable If your video source has component video connectors, you can use them to project a higher quality video image. However, you'll need a component video cable, which can be purchased from EPSON (ELPKC19). Before starting, make sure the projector and your DVD player or other video device are turned off. 1. Connect the large end of the component video cable to the projector's Computer/Component Video port. 2. Insert the three ends of the component video cable into the R, G, and B ports on your video source. 3. Connect the audio plugs on the RCA A/V cable as described on page 16. 4. After you turn on the projector, use the Video menu to set the Input Signal to YCbCr or YPbPr. See page 40 for more information. 18 Setting Up the Projector
-
 1
1 -
2
-
3
-
4
-
5
-
6
-
7
-
8
-
9
-
10
-
11
-
12
-
13
-
14
-
15
-
16
-
17
-
18
-
 19
19 -
 20
20 -
 21
21 -
 22
22 -
 23
23 -
 24
24 -
 25
25 -
 26
26 -
 27
27 -
 28
28 -
 29
29 -
30
-
31
-
32
-
33
-
34
-
35
-
36
-
37
-
38
-
39
-
40
-
41
-
42
-
43
-
44
-
45
-
46
-
47
-
48
-
49
-
50
-
51
-
52
-
53
-
54
-
55
-
56
-
57
-
58
-
59
-
60
-
61
-
62
-
63
-
64
-
65
-
66
-
67
-
68
-
69
-
70
-
71
-
72
-
73
-
74
-
75
-
76
-
77
-
78
-
79
-
80
-
81
-
82
-
83
-
84
-
85
-
86
-
87
-
88
-
89
-
90
-
91
-
92
-
93
-
94
-
95
-
96
-
97
-
98
-
99
-
100
-
101
-
102
-
103
-
104
-
105
-
106
-
107
-
108
 |
 |
