Epson PowerLite 750c Product Information Guide - Page 7
Shutting Down the Projector, Using the Remote Control - replacement lamp
 |
View all Epson PowerLite 750c manuals
Add to My Manuals
Save this manual to your list of manuals |
Page 7 highlights
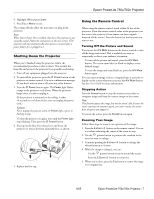
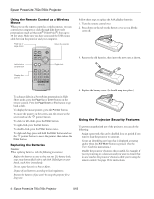
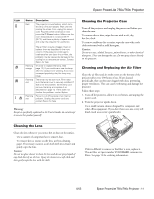
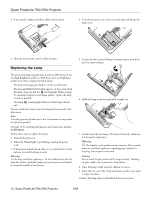
Epson PowerLite 750c/760c Projector 4. Highlight ON and press Enter. 5. Press Esc or Menu to exit. The setting will take effect the next time you plug in the projector. Note: When Direct Power On is enabled, shut down the projector as you normally would. Follow the instructions in the next section. (The projector will start automatically when power is restored after a power failure if it is plugged in.) Shutting Down the Projector When you've finished using the projector, follow the recommended procedure to shut it down. This extends the lamp life and protects the projector from possible overheating. 1. Turn off any equipment plugged into the projector. 2. To turn off the projector, press the P Power button on the projector or remote control. You see a confirmation message. (If you don't want to turn it off, press any other button.) 3. Press the P Power button again. The Power light flashes orange as the projector cools down. When the projector beeps twice, it's safe to unplug it. (If the projector is mounted on the ceiling, it takes 10 seconds to cool down before you can unplug the power cord.) Caution: Never unplug the projector when the Power light is green or flashing orange. To turn the projector on again, wait until the Power light stops flashing. Then press the P Power button. 4. Press up on the blue foot release lever and lower the projector to retract the front adjustable foot, as shown. 5. Replace the lens cap. Using the Remote Control When using the remote control, stand within 20 feet of the projector. Point the remote control either at the projector or at the screen (the projector's front sensor can detect signals bounced off the screen). Press the button for the function you want to use. Turning Off the Picture and Sound You can use the A/V Mute button on the remote control to turn off the image and sound. This is useful if you want to temporarily re-direct your audience's attention. ❏ To turn off the picture and sound, press the A/V Mute button. The screen turns blue (or black or displays a userdefined image). ❏ To turn the image and sound back on, press the A/V Mute button again. You can create an image, such as a company logo or a picture, to display on the screen whenever you press the A/V Mute button. See the User's Guide for more information. Stopping Action Press the Freeze button to stop the action in your video or computer image and keep the current image on the screen. Note: This function pauses the image, but not the sound. Also, because the source continues to transmit signals, you won't resume the action from the point you stopped it. To restart the action, press the Freeze button again. Zooming Your Image Follow these steps to zoom in on a portion of the image: 1. Press the E-Zoom button on the remote control. You see a crosshair indicating the center of the zoom-in area. 2. Use the pointer button to position the crosshair in the area you want to enlarge. 3. Continue pressing the E-Zoom button to enlarge the selected area up to 4 times. 4. While the image is enlarged, you can: ❏ Use the pointer button to move around the screen. ❏ Press the E-Zoom button to zoom out. 5. When you're done, press the Esc button to return the image to its original size. 8/05 Epson PowerLite 750c/760c Projector - 7
-
 1
1 -
 2
2 -
 3
3 -
 4
4 -
 5
5 -
 6
6 -
 7
7 -
 8
8 -
 9
9 -
 10
10 -
 11
11 -
 12
12 -
13
 |
 |
