Epson PowerLite 905 Quick Setup - Page 3
Project over a wired, network - driver
 |
View all Epson PowerLite 905 manuals
Add to My Manuals
Save this manual to your list of manuals |
Page 3 highlights
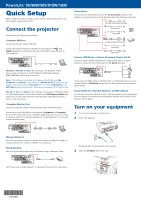
5 Replace the wireless LAN module stopper and secure it using the screw you removed. 13 Select the Wireless LAN menu and press Enter. 6 Close the air filter cover. 7 Plug in and turn on the projector. 8 To configure your projector for your wireless network, do one of the following: • If you're using the optional Quick Wireless Connection USB key (Windows only), insert it into the projector's USB TypeA port, wait for the displayed message, remove the key, and connect it to a USB port on your computer. Follow the on-screen instructions to install the driver, then run your presentation. For details, see the User's Guide on your projector CD. • If you're not using the key, continue with these steps. 9 Press the Menu button on the remote control, select the Network menu, and press Enter. 10 Choose Network Configuration and press Enter. 11 Select the Basic menu and press Enter. 12 Select the Projector Name setting and enter a name (up to 16 characters long) to identify your projector over the network. Use the displayed keyboard to enter characters. Press the arrow buttons on the remote control to highlight the characters and press Enter to select them. Note: See the User's Guide on the projector CD for information on adding passwords. 14 Select the Connection Mode setting and choose one of these options: • Quick to connect the projector to one computer on the network • Advanced to connect the projector to multiple computers on the network 15 If you selected Quick connection mode, select the Channel setting for your wireless network and turn on the SSID Auto Setting setting. 16 Select the type of wireless network you are using as the Wireless LAN Sys. setting. 17 If you selected Advanced connection mode, enter your network SSID (up to 32 characters) as the SSID setting. 18 If your network assigns addresses automatically, select IP Settings and turn on the DHCP setting. If not, turn off the DHCP setting and enter the projector's IP Address, Subnet Mask, and Gateway Address, as needed. 19 To prevent the SSID and IP address from appearing on the network standby screen, set the SSID Display and/or IP Address Display settings to Off. 20 When you are finished, select Complete and press Enter, then press Enter again to save your settings. 21 Press the Menu button to exit the menu system. 22 See "Install network software" for additional instructions. Project over a wired network Follow the steps here to configure your projector for your wired network using the projector's menu system. 1 Plug in and turn on the projector. 2 Press the Menu button on the remote control, select the Network menu, and press Enter.
-
 1
1 -
 2
2 -
 3
3 -
 4
4
 |
 |
