Epson PowerLite 9100i User Manual - Lens Options - Page 16
Mounting the rear-projection wide-angle lens, Remove the current lens.
 |
View all Epson PowerLite 9100i manuals
Add to My Manuals
Save this manual to your list of manuals |
Page 16 highlights
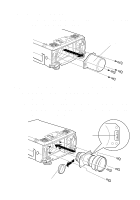
(2) Remove the current lens. 1. Use the enclosed screwdriver to remove the four mounting screws, and dismount the current lens. Current lens 2-2 Mounting the rear-projection wide-angle lens (1) Mounting the rear-projection wide-angle lens 1. Remove the rear lens cap. 2. Use the enclosed screwdriver to mount the rear projector wide lens with the four mounting screws. Be sure that the seal reading "UPPER" is on top. Seal Rear lens cap 14
-
 1
1 -
2
-
3
-
4
-
5
-
6
-
7
-
8
-
9
-
10
-
 11
11 -
 12
12 -
 13
13 -
 14
14 -
 15
15 -
 16
16 -
 17
17 -
 18
18 -
 19
19 -
 20
20 -
 21
21 -
22
-
23
-
24
-
25
-
26
-
27
-
28
-
29
-
30
-
31
 |
 |

14
Rear lens cap
(2) Remove the current lens.
1. Use the enclosed screwdriver to remove the four mounting
screws, and dismount the current lens.
2-2 Mounting the rear-projection wide-angle lens
(1) Mounting the rear-projection wide-angle lens
1. Remove the rear lens cap.
2. Use the enclosed screwdriver to mount the rear projector wide
lens with the four mounting screws. Be sure that the seal read-
ing “UPPER” is on top.
Current lens
Seal