Epson PowerLite Home Cinema 3010 User's Guide - Page 19
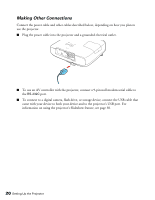
Insert the end of the cable clip anchor into the cable clip hole near the HDMI port,
 |
View all Epson PowerLite Home Cinema 3010 manuals
Add to My Manuals
Save this manual to your list of manuals |
Page 19 highlights
Port name PC Video equipment connection - Computer connection Use a Mini D-sub, 15-pin monitor cable to connect to a computer RGB (monitor) port: Video For audio, use a stereo RCA to mini-jack stereo (3.5 mm) audio cable: Use an RCA video and audio cable: - For best results, connect your video equipment to the HDMI port, if possible. If your equipment doesn't support HDMI, connect it to either the Component (for high quality, component video) or Video (for composite video) port. When you connect an HDMI cable to the projector, it is recommended that you fasten it with the included cable clip. Follow these steps to install the cable clip: 1. Connect the HDMI cable to one of the HDMI ports on the projector. 2. Insert the end of the cable clip anchor into the cable clip hole near the HDMI port, as show below. 3. Place the open cable clip around the HDMI cable, but don't lock it into place. 4. Slide the cable clip towards the projector and lock the clip onto the HDMI connector. To remove the cable clip, unlock the clip and disconnect the HDMI cable. Then pinch the side of the cable clip anchor and carefully pull it out of the cable clip hole. Setting Up the Projector 19
-
 1
1 -
2
-
3
-
4
-
5
-
6
-
7
-
8
-
9
-
10
-
11
-
12
-
13
-
 14
14 -
 15
15 -
 16
16 -
 17
17 -
 18
18 -
 19
19 -
 20
20 -
 21
21 -
 22
22 -
 23
23 -
 24
24 -
25
-
26
-
27
-
28
-
29
-
30
-
31
-
32
-
33
-
34
-
35
-
36
-
37
-
38
-
39
-
40
-
41
-
42
-
43
-
44
-
45
-
46
-
47
-
48
-
49
-
50
-
51
-
52
-
53
-
54
-
55
-
56
-
57
-
58
-
59
-
60
-
61
-
62
-
63
-
64
-
65
-
66
-
67
-
68
-
69
-
70
-
71
-
72
-
73
-
74
-
75
-
76
-
77
-
78
-
79
-
80
-
81
-
82
-
83
-
84
-
85
-
86
-
87
-
88
 |
 |
