Epson PowerLite Home Cinema 725HD User Manual - Page 31
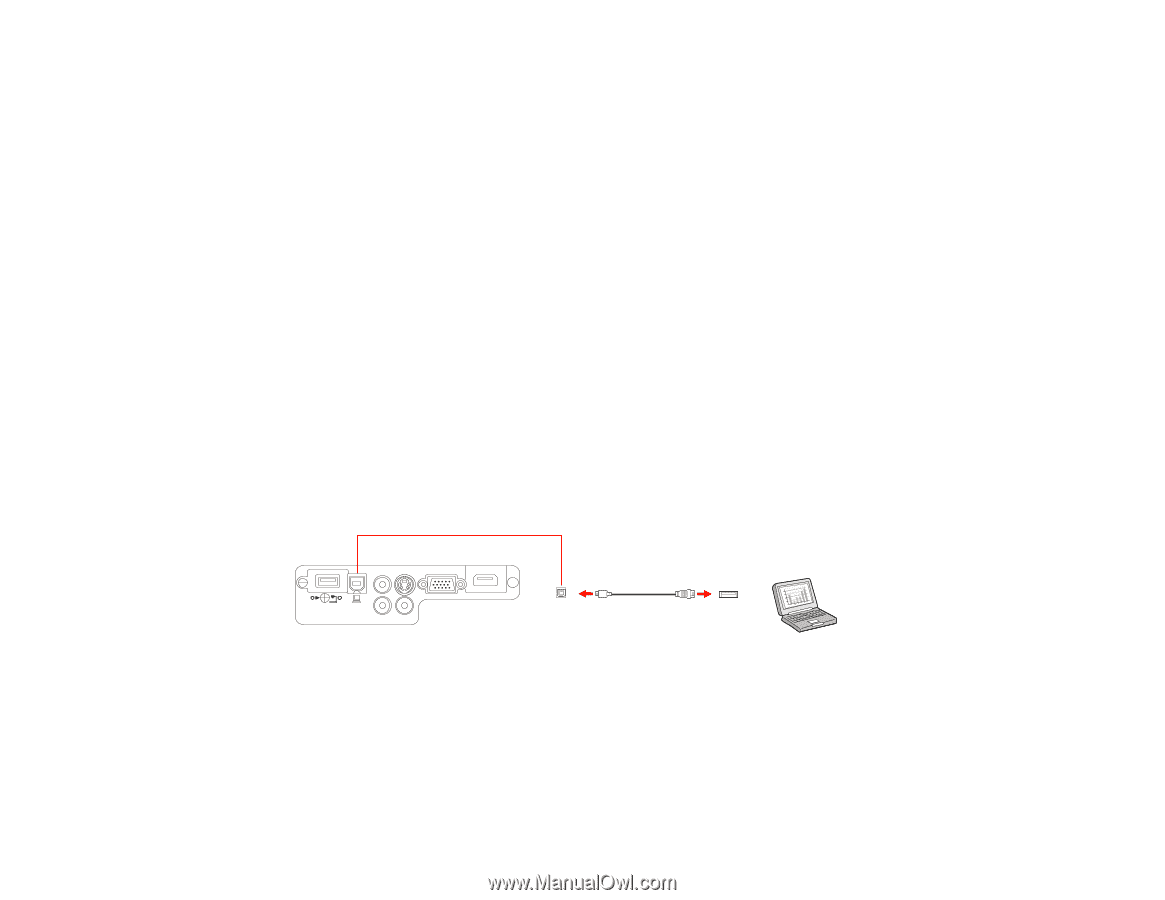
Connecting to Computer Sources, Connecting to a Computer for USB Video and Audio
 |
View all Epson PowerLite Home Cinema 725HD manuals
Add to My Manuals
Save this manual to your list of manuals |
Page 31 highlights
Connecting to Computer Sources Follow the instructions in these sections to connect a computer to the projector. Connecting to a Computer for USB Video and Audio Connecting to a Computer for VGA Video Connecting to a Computer for HDMI Video and Audio Connecting to a Computer for USB Mouse Control Connecting to a Computer for Sound Parent topic: Projector Connections Connecting to a Computer for USB Video and Audio If your computer meets the system requirements, you can send video and audio output to the projector through the computer's USB port (preferably USB 2.0). Connect the projector to your computer using a USB cable. Note: A USB connection may cause a delay for content requiring high bandwidth, such as movies. An HDMI connection is recommended for projecting movies, video games, and other home entertainment content. 1. In the projector's Extended menu, set the USB Type B setting to USB Display. 2. Turn on your computer. 3. Connect the cable to your projector's USB-B port. 4. Connect the other end to any available USB port on your computer. 5. Do one of the following: • Windows 8: Click EPSON_PJ_UD in the upper right-corner, then select Run EMP_UDSE.EXE in the dialog box that appears to install the Epson USB Display software. • Windows 7/Windows Vista: Select Run EMP_UDSE.EXE in the dialog box that appears to install the Epson USB Display software. 31
-
 1
1 -
2
-
3
-
4
-
5
-
6
-
7
-
8
-
9
-
10
-
11
-
12
-
13
-
14
-
15
-
16
-
17
-
18
-
19
-
20
-
21
-
22
-
23
-
24
-
25
-
 26
26 -
 27
27 -
 28
28 -
 29
29 -
 30
30 -
 31
31 -
 32
32 -
 33
33 -
 34
34 -
 35
35 -
 36
36 -
37
-
38
-
39
-
40
-
41
-
42
-
43
-
44
-
45
-
46
-
47
-
48
-
49
-
50
-
51
-
52
-
53
-
54
-
55
-
56
-
57
-
58
-
59
-
60
-
61
-
62
-
63
-
64
-
65
-
66
-
67
-
68
-
69
-
70
-
71
-
72
-
73
-
74
-
75
-
76
-
77
-
78
-
79
-
80
-
81
-
82
-
83
-
84
-
85
-
86
-
87
-
88
-
89
-
90
-
91
-
92
-
93
-
94
-
95
-
96
-
97
-
98
-
99
-
100
-
101
-
102
-
103
-
104
-
105
-
106
-
107
-
108
-
109
-
110
-
111
-
112
-
113
-
114
-
115
-
116
-
117
-
118
-
119
-
120
-
121
-
122
-
123
-
124
-
125
-
126
-
127
-
128
-
129
-
130
-
131
-
132
-
133
-
134
-
135
-
136
-
137
-
138
-
139
-
140
-
141
-
142
-
143
-
144
-
145
-
146
-
147
-
148
-
149
-
150
-
151
-
152
-
153
-
154
-
155
-
156
-
157
-
158
-
159
-
160
-
161
-
162
-
163
-
164
-
165
-
166
-
167
-
168
-
169
-
170
-
171
-
172
-
173
-
174
-
175
-
176
-
177
-
178
-
179
-
180
-
181
-
182
-
183
-
184
-
185
-
186
-
187
-
188
-
189
-
190
-
191
-
192
-
193
-
194
-
195
-
196
-
197
-
198
 |
 |