Epson PowerLite Pro Cinema 1080 User's Guide - Page 33
Making Detailed Adjustments, Using the Menu System
 |
View all Epson PowerLite Pro Cinema 1080 manuals
Add to My Manuals
Save this manual to your list of manuals |
Page 33 highlights
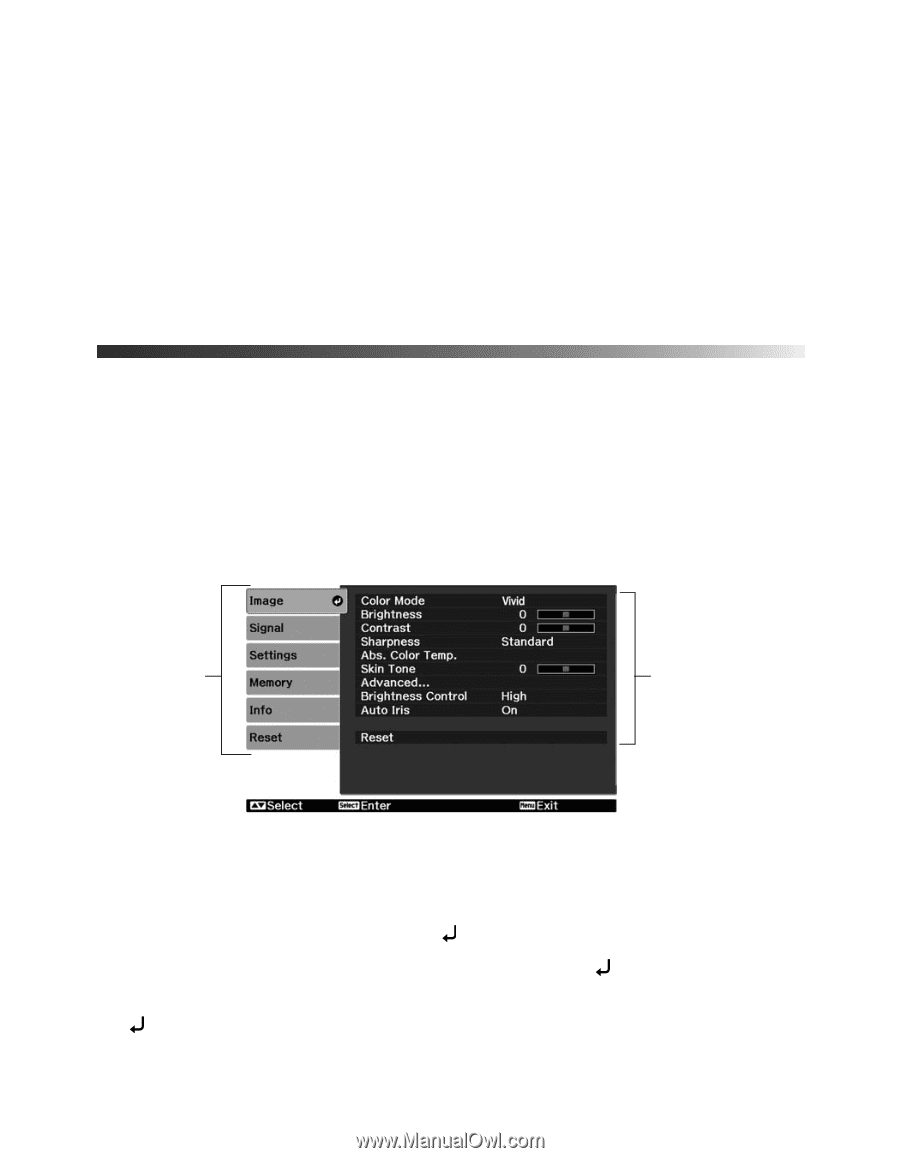
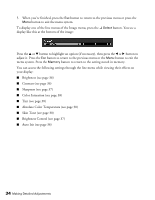
Making Detailed Adjustments You can use the projector's on-screen menus to make detailed adjustments to the image quality-such as the brightness, contrast, sharpness, and color. You can also change the menu display, sleep mode settings, and other projector features. Using the Menu System You can access the menu system either from the remote control or the buttons on the projector's control panel. You can access the full menu or a line menu that lets you adjust the Picture and Memory settings while viewing their effects on your display. You can also change the menu language and control how the menus display (see page 35). 1. To display the full menu, press the Menu button on the projector or remote control. You see a display like this one (the actual display depends on the connected equipment): Main menu options Settings available for the highlighted menu Note: Depending on which equipment is connected to the projector, some options may not be available. 2. Press the u or d button to highlight a main menu option (Image, Signal, Settings, Memory, Info or Reset), then press the Select button to select it. 3. Press the u or d button to highlight a setting, then press the Select button. 4. Press the u, d, l, or r button to change settings as necessary. You may have to press the Select button to confirm your choice. Making Detailed Adjustments 33
-
 1
1 -
2
-
3
-
4
-
5
-
6
-
7
-
8
-
9
-
10
-
11
-
12
-
13
-
14
-
15
-
16
-
17
-
18
-
19
-
20
-
21
-
22
-
23
-
24
-
25
-
26
-
27
-
 28
28 -
 29
29 -
 30
30 -
 31
31 -
 32
32 -
 33
33 -
 34
34 -
 35
35 -
 36
36 -
 37
37 -
 38
38 -
39
-
40
-
41
-
42
-
43
-
44
-
45
-
46
-
47
-
48
-
49
-
50
-
51
-
52
-
53
-
54
-
55
-
56
-
57
-
58
-
59
-
60
-
61
-
62
-
63
-
64
-
65
-
66
-
67
-
68
-
69
-
70
-
71
-
72
-
73
-
74
-
75
-
76
 |
 |