Epson PowerLite Pro G5950 User's Guide - Page 61
Resizing Video Images
 |
View all Epson PowerLite Pro G5950 manuals
Add to My Manuals
Save this manual to your list of manuals |
Page 61 highlights
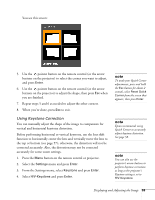
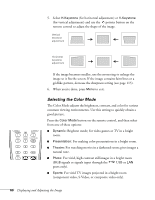
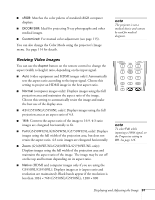
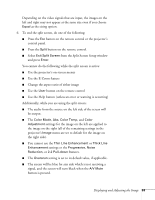
■ sRGB: Matches the color palette of standard sRGB computer displays. ■ DICOM SIM: Ideal for projecting X-ray photographs and other medical images. ■ Customized: For manual color adjustment (see page 115). You can also change the Color Mode using the projector's Image menu. See page 114 for details. note The projector is not a medical device and cannot be used for medical diagnosis. Resizing Video Images You can use the Aspect button on the remote control to change the aspect (width to height) ratio, depending on the input signal. ■ Auto (video equipment and HDMI images only): Automatically sets the aspect ratio according to the input signal. Choose this setting to project an HDMI image in the best aspect ratio. ■ Normal (computer images only): Displays images using the full projection area and maintains the aspect ratio of the image. Choose this setting to automatically resize the image and make the best use of the display area. ■ 4:3 (G5550NL/G5950NL only): Displays images using the full projection area at an aspect ratio of 4:3. ■ 16:9: Converts the aspect ratio of the image to 16:9. 4:3 ratio images are elongated horizontally to fit. ■ Full (G5450WUNL/G5650WNL/G5750WUNL only): Displays images using the full width of the projection area, but does not retain the aspect ratio. 4:3 ratio images are elongated horizontally. ■ Zoom (G5450WUNL/G5650WNL/G5750WUNL only): Displays images using the full width of the projection area and maintains the aspect ratio of the image. The image may be cut off on the top and bottom depending on its aspect ratio. ■ Native (HDMI and computer images only if you are using the G5550NL/G5950NL): Displays images as is (aspect ratio and resolution are maintained). Black bands appear if the resolution is less than 1024 × 768 (G5550NL/G5950NL), 1280 × 800 note To select Full while inputting a 1080i signal, set the Progressive setting to Off. See page 116. Displaying and Adjusting the Image 61
-
 1
1 -
2
-
3
-
4
-
5
-
6
-
7
-
8
-
9
-
10
-
11
-
12
-
13
-
14
-
15
-
16
-
17
-
18
-
19
-
20
-
21
-
22
-
23
-
24
-
25
-
26
-
27
-
28
-
29
-
30
-
31
-
32
-
33
-
34
-
35
-
36
-
37
-
38
-
39
-
40
-
41
-
42
-
43
-
44
-
45
-
46
-
47
-
48
-
49
-
50
-
51
-
52
-
53
-
54
-
55
-
 56
56 -
 57
57 -
 58
58 -
 59
59 -
 60
60 -
 61
61 -
 62
62 -
 63
63 -
 64
64 -
 65
65 -
 66
66 -
67
-
68
-
69
-
70
-
71
-
72
-
73
-
74
-
75
-
76
-
77
-
78
-
79
-
80
-
81
-
82
-
83
-
84
-
85
-
86
-
87
-
88
-
89
-
90
-
91
-
92
-
93
-
94
-
95
-
96
-
97
-
98
-
99
-
100
-
101
-
102
-
103
-
104
-
105
-
106
-
107
-
108
-
109
-
110
-
111
-
112
-
113
-
114
-
115
-
116
-
117
-
118
-
119
-
120
-
121
-
122
-
123
-
124
-
125
-
126
-
127
-
128
-
129
-
130
-
131
-
132
-
133
-
134
-
135
-
136
-
137
-
138
-
139
-
140
-
141
-
142
-
143
-
144
-
145
-
146
-
147
-
148
-
149
-
150
-
151
-
152
-
153
-
154
-
155
-
156
-
157
-
158
-
159
-
160
-
161
-
162
-
163
-
164
-
165
-
166
-
167
-
168
-
169
-
170
-
171
-
172
-
173
-
174
-
175
-
176
-
177
-
178
-
179
-
180
-
181
-
182
-
183
-
184
-
185
-
186
-
187
-
188
-
189
-
190
-
191
-
192
-
193
-
194
-
195
-
196
-
197
-
198
-
199
-
200
-
201
-
202
-
203
-
204
-
205
-
206
-
207
-
208
-
209
-
210
-
211
-
212
-
213
-
214
-
215
-
216
-
217
 |
 |
