Epson S60600 User Manual - Page 28
Installing the software, Connecting to your system
 |
View all Epson S60600 manuals
Add to My Manuals
Save this manual to your list of manuals |
Page 28 highlights
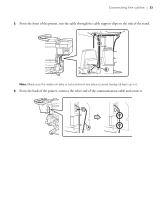
28 | Installing the software Installing the software Insert the included ONYX® USB flash drive into your computer and follow the on-screen instructions to install the ONYX GamaPrint™ Pro RIP software. If you do not have the ONYX USB flash drive or do not want to use the included RIP software, visit the Epson support site below for your model to download the necessary software. • SC-S40600 - www.epson.com/support/s40600downloads • SC-S60600 - www.epson.com/support/s60600downloads • SC-S80600 - www.epson.com/support/s80600downloads Connecting to your system You can use USB and/or Ethernet network connections. For USB connection, make sure your system has the appropriate port and that you have a standard, shielded cable, 10 feet (3 m) long or less. Note: Do not connect the printer until a software installation screen prompts you to. To connect to a network hub, or directly to your computer's network interface, you need a standard RJ-45 CAT-6 network cable. 1. Make sure the printer is turned off. 2. Plug the interface cable into the appropriate port on the printer. 3. Plug the other end of the cable into the appropriate port on your computer or network switch or hub. 4. Route the interface cable through the cable support on the printer stand along with the power cords. If you connected to your printer through a network, follow the instructions in the next section to configure the printer for your network.
-
 1
1 -
2
-
3
-
4
-
5
-
6
-
7
-
8
-
9
-
10
-
11
-
12
-
13
-
14
-
15
-
16
-
17
-
18
-
19
-
20
-
21
-
22
-
 23
23 -
 24
24 -
 25
25 -
 26
26 -
 27
27 -
 28
28 -
 29
29 -
 30
30 -
 31
31 -
 32
32
 |
 |
