Epson Stylus C60 Start Here Card
Epson Stylus C60 - Ink Jet Printer Manual
 |
View all Epson Stylus C60 manuals
Add to My Manuals
Save this manual to your list of manuals |
Epson Stylus C60 manual content summary:
- Epson Stylus C60 | Start Here Card - Page 1
EPSON Stylus® C60 SStatrat rHtereHere 11Unpack 1 Remove everything from the box. printer paper support ink cartridges CD-ROM Printer Basics 2 Remove all the tape and packing material. 3 Peel off tape and remove the insert. 4 Fit the paper support into its three slots. remove the insert - Epson Stylus C60 | Start Here Card - Page 2
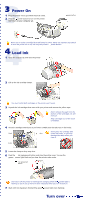
or off; use only the printer's power button. 44Load Ink 1 Open the output tray and raise the printer cover. 2 1 2 Lift up the ink cartridge clamps. You must install both cartridges or the printer won't work. 3 Unpack the ink cartridges that came with your printer and remove the yellow tape. Don - Epson Stylus C60 | Start Here Card - Page 3
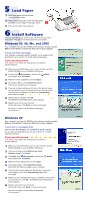
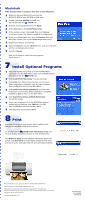
of instructions for your system. Windows 95, 98, Me, and 2000 Your computer may have the EPSON printer software already installed. Make sure the printer is turned on, then turn on your computer. If you see this message Your software is already installed. Click OK. You're ready to start printing! Or - Epson Stylus C60 | Start Here Card - Page 4
(installed in section 7). You see this screen. Click Reference Guide to view detailed information about your printer. Click Print Show to view helpful animations that show you how to print, load paper and ink, and solve basic problems. EPSON and EPSON Stylus are registered trademarks of SEIKO EPSON
-
 1
1 -
 2
2 -
 3
3 -
 4
4
 |
 |

1
ink cartridges
paper support
printer
1
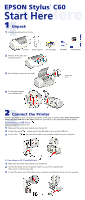
Unpack
1
Remove everything from the box.
2
CD-ROM
2
Connect the Printer
2
Remove all the tape and
packing material.
4
Fit the paper support
into its three slots.
Start Here
EPSON Stylus
®
C60
Start Here
Printer Basics
3
Peel off tape and remove the insert.
remove the
insert
Connect the printer to your computer using either a USB cable or parallel cable.
Don’t connect both
cables; you only need one or the other.
Follow the instructions in the appropriate section below.
If You Have a USB Port
(Does not support Windows
®
95.)
1
Make sure the printer and computer are turned off.
2
Connect the
square end of the USB cable to your printer’s USB port.
3
Connect the
flat end of the cable to any available USB port on your computer.
If You Have a PC Parallel Port
1
Make sure the printer and computer are turned off.
2
Connect the larger end of the parallel cable to your printer’s parallel port.
Then secure it with the wire clips.
3
Connect the other end of the cable to your computer’s parallel port and secure it as necessary.