Epson Stylus C66 Product Information Guide - Page 5
Running a Printer Check, Selecting the Correct Paper Type, Start Here, Quick Guide, User's Guide - ink cartridges
 |
View all Epson Stylus C66 manuals
Add to My Manuals
Save this manual to your list of manuals |
Page 5 highlights
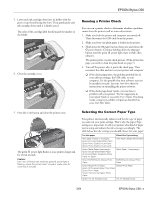
EPSON Stylus C66 5. Lower each ink cartridge down into its holder with the green circuit board facing the front. Then gently push each ink cartridge down until it is firmly seated. The color of the cartridge label should match the marker on the holder. 6. Close the cartridge cover. Running a Printer Check You can run a printer check to determine whether a problem comes from the printer itself or some other source. 1. Make sure both the printer and computer are turned off. Then disconnect the USB cable from the printer. 2. Make sure letter-size plain paper is loaded in the printer. 3. Hold down the ) paper button, then press and release the P power button. Continue holding down the ) paper button until the green P power light starts to flash, then release it. The printer prints a nozzle check pattern. (If the pattern has gaps, you need to clean the print head; see page 7.) 4. Turn off the printer after it prints the check page. Then reconnect the cable and turn on your printer and computer. ❏ If the check page prints, the problem probably lies in your software settings, the USB cable, or your computer. It's also possible that your software may not be installed correctly. See your Start Here sheet for instructions on reinstalling the printer software. ❏ If the check page doesn't print, you may have a problem with your printer. Try the suggestions in your Quick Guide or on-screen User's Guide. If nothing works, contact your dealer or Epson as described on your Start Here sheet. 7. Press the H ink button and close the printer cover. The green P power light flashes as your printer charges ink for several seconds. Caution: Don't turn off the printer while the green P power light is flashing, unless the printer hasn't moved or made noise for more than 5 minutes. Selecting the Correct Paper Type Your printer automatically adjusts itself for the type of paper you select in your print settings. That's why the paper Type setting is so important. It tells your printer what kind of paper you're using and adjusts the ink coverage accordingly. The table below lists the settings you should choose for your paper: For this paper Select this Type setting Plain paper sheets or envelopes Epson Premium Bright White Paper Epson Photo Quality Ink Jet Paper Epson Photo Quality Ink Jet Cards Plain Paper / Bright White Paper Epson Matte Paper Heavyweight Epson Double-Sided Matte Paper PremierArt Matte Scrapbook Photo Paper for Epson Matte Paper - Heavyweight Epson DURABrite Ink Glossy Photo Paper DURABrite Ink Glossy Photo Paper Epson Glossy Photo Paper Glossy Photo Paper Epson All Purpose Glossy Photo Paper Epson Photo Paper Epson Premium Semigloss Photo Paper Epson Ink Jet Transparencies Ink Jet Transparencies 3/04 EPSON Stylus C66 - 5
-
 1
1 -
 2
2 -
 3
3 -
 4
4 -
 5
5 -
 6
6 -
 7
7 -
 8
8 -
 9
9 -
 10
10
 |
 |
