Epson Stylus C68 Quick Reference Guide - Page 16
message and click, Select your paper
 |
View all Epson Stylus C68 manuals
Add to My Manuals
Save this manual to your list of manuals |
Page 16 highlights
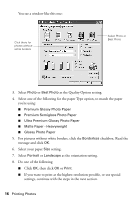
You see a window like this one: Click there for photos without white borders Select Photo or Best Photo 3. Select Photo or Best Photo as the Quality Option setting. 4. Select one of the following for the paper Type option, to match the paper you're using: ■ Premium Glossy Photo Paper ■ Premium Semigloss Photo Paper ■ Ultra Premium Glossy Photo Paper ■ Matte Paper - Heavyweight ■ Glossy Photo Paper 5. For pictures without white borders, click the Borderless checkbox. Read the message and click OK. 6. Select your paper Size setting. 7. Select Portrait or Landscape as the orientation setting. 8. Do one of the following: ■ Click OK, then click OK or Print. ■ If you want to print at the highest resolution possible, or use special settings, continue with the steps in the next section. 16 Printing Photos
-
 1
1 -
2
-
3
-
4
-
5
-
6
-
7
-
8
-
9
-
10
-
 11
11 -
 12
12 -
 13
13 -
 14
14 -
 15
15 -
 16
16 -
 17
17 -
 18
18 -
 19
19 -
 20
20 -
 21
21 -
22
-
23
-
24
-
25
-
26
-
27
-
28
-
29
-
30
-
31
-
32
-
33
-
34
-
35
-
36
-
37
-
38
-
39
-
40
-
41
-
42
-
43
-
44
 |
 |
