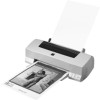
Epson Stylus Photo 1200 Product Information Guide - Page 5
Control Panel, Installing Ink Cartridges For The First Time, Don't - error
 |
View all Epson Stylus Photo 1200 manuals
Add to My Manuals
Save this manual to your list of manuals |
Page 5 highlights
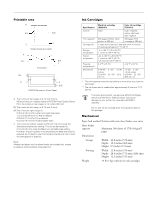
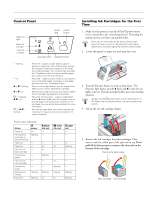
EPSON Stylus Photo 1200 Control Panel paper out light black ink out light color ink out light power power light button cleaning button load/eject button S flashing S on B or A flashing B or A on P S flashing B A on P S B A flashing When the S paper out light flashes, paper is jammed in the printer. Turn off the printer, remove all the paper (including any pieces torn off inside), then reload the stack. Turn on the printer and press the E load/eject button. For tips on avoiding paper jams, see your printer documentation. When the S paper out light comes on, your paper is out or incorrectly loaded. Load paper in the feeder and then press the E load/eject button. When an ink out light flashes, your ink supply is low. Make sure you have a replacement cartridge. When an ink out light comes on, you need to replace the ink cartridge. See page 8 for instructions. When the P power and S paper out lights flash and the B black and A color ink out lights come on, jammed paper may be blocking movement of the print head. See your printer documentation for more information. When all the lights flash, your printer may have an internal error. See your printer documentation for more information. Printer status indications Status Power on Ink sequence, exchange, or data processing Paper out P power on flashing - Paper jam Ink out or no black cartridge Ink level low (black) Ink out or no color cartridge Ink level low (color) Maintenance request Fatal error - - - - - flashing flashing B black ink out - - - off on flashing - - flashing on A color ink out - - S paper out - - - off - - on flashing flashing on on flashing - - - - flashing flashing Installing Ink Cartridges for the First Time 1. Make sure the printer is turned off (the P power button level is raised above the control panel level). Then plug the printer's power cord into a grounded outlet. Don't use an outlet that can be turned off by a wall switch or timer, or one on the same circuit as a large appliance to avoid damaging the printer's power supply. 2. Lower the printer's output tray and open the cover. 3. Press the P power button to turn on the printer. The P power light flashes and the B black and A color ink out lights come on. The ink cartridge holders move into loading position. Always use the P power button to turn the printer on or off. Never use an external switch, such as a power strip switch. 4. Lift up the two ink cartridge clamps. 5. Remove the ink cartridges from their packages. Then remove only the yellow part of the tape seal on top. Don't pull off the blue portion or remove the clear seal on the bottom of the cartridge. Remove the yellow tape black cartridge color cartridge 3/99 EPSON Stylus Photo 1200 - 5
-
 1
1 -
 2
2 -
 3
3 -
 4
4 -
 5
5 -
 6
6 -
 7
7 -
 8
8 -
 9
9 -
 10
10 -
 11
11 -
12
 |
 |
