Epson Stylus Pro 10000 - Archival Ink Quick Reference Guide - Page 6
Aligning the Print Head, SelecType, ALIGNMENT MENU, PAPER THICK=STD, Enter, ADJUST., PATT.=ALL, Pause
 |
View all Epson Stylus Pro 10000 - Archival Ink manuals
Add to My Manuals
Save this manual to your list of manuals |
Page 6 highlights
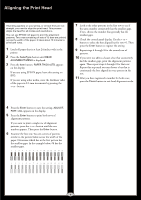
Aligning the Print Head If banding appears on your prints, or vertical lines are not straight, you need to align the print head. This process aligns the head for all modes and resolutions. You can use EPSON roll paper to print the alignment patterns. Two rows consisting of sets of 15 bars are printed across the width of the paper. It takes about 10 minutes to print both rows. 1 Load roll paper that is at least 24 inches wide in the printer. 2 Press the SelecType button until HEAD ALIGNMENT MENU is displayed. 3 Press the Item button. PAPER THICK=STD appears on the display. If you are using EPSON paper, leave this setting on STD. If you are using other media, enter the thickness value of the paper in 0.1-mm increments by pressing the + or - button. 7 Look at the other patterns in the first row to see if the same number consistently has the smallest gaps. If not, choose the number that generally has the smallest gaps. 8 Check the control panel display. Use the + or - button to select the best aligned bar for row #1. Then press the Enter button to register the setting. 9 Repeat steps 6 through 8 for the second row of patterns. 10 If you were not able to choose a bar that consistently had the smallest gaps, print the alignment patterns again. Then repeat steps 6 through 8 for that row. Repeat this step until you can choose a bar that is consistently the best aligned in every pattern in the row. 11 After you have registered a number for both rows, press the Pause button to exit head alignment mode. 4 Press the Enter button to save the setting. ADJUST. PATT.=ALL appears on the display. 5 Press the Enter button to print both rows of alignment patterns. If you want to print a single row of alignment patterns, press the + or - button until the row number appears. Then press the Enter button. 6 Examine the first row. You see a series of patterns similar to the pattern below across the width of the paper. Determine which bar in the first pattern has the smallest gaps. In the example below, #8 has the smallest gaps. 5
-
 1
1 -
 2
2 -
 3
3 -
 4
4 -
 5
5 -
 6
6 -
 7
7 -
 8
8 -
 9
9 -
 10
10 -
 11
11
 |
 |
