Epson SureColor S50675 Setup Guide - Page 19
restrain the cords as shown.
 |
View all Epson SureColor S50675 manuals
Add to My Manuals
Save this manual to your list of manuals |
Page 19 highlights
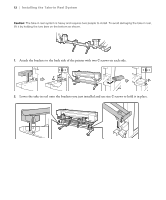
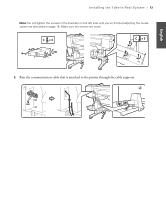
English Installing the Take-up Reel System | 17 3. Connect the communication cord that is attached to the take-up reel system by running it through the horizontal struts to the back of the printer. Place the cable in the cable supports and plug it in, making sure to tighten the screws on the plug to secure it in place. 4. Attach the cable supports, then connect the power cords to the printer and use the cable supports to restrain the cords as shown. 5. Plug the printer into outlets that are easily accessible. Note that two outlets are required, for a total of 20 amps. It is recommended that the outlets be powered by a dedicated 30-amp circuit.
-
 1
1 -
2
-
3
-
4
-
5
-
6
-
7
-
8
-
9
-
10
-
11
-
12
-
13
-
 14
14 -
 15
15 -
 16
16 -
 17
17 -
 18
18 -
 19
19 -
 20
20 -
 21
21 -
 22
22 -
 23
23 -
 24
24 -
25
-
26
-
27
-
28
-
29
-
30
-
31
-
32
-
33
-
34
-
35
-
36
-
37
-
38
-
39
-
40
-
41
-
42
-
43
-
44
-
45
-
46
-
47
-
48
-
49
-
50
-
51
-
52
-
53
-
54
-
55
-
56
-
57
-
58
-
59
-
60
-
61
-
62
-
63
-
64
-
65
-
66
-
67
-
68
-
69
-
70
-
71
-
72
-
73
-
74
-
75
-
76
-
77
-
78
-
79
-
80
-
81
-
82
-
83
-
84
-
85
-
86
-
87
-
88
-
89
-
90
-
91
-
92
-
93
-
94
-
95
-
96
-
97
-
98
-
99
-
100
-
101
-
102
-
103
-
104
-
105
-
106
-
107
-
108
-
109
-
110
-
111
-
112
-
113
-
114
-
115
-
116
-
117
-
118
-
119
-
120
-
121
-
122
-
123
-
124
-
125
-
126
-
127
-
128
-
129
-
130
 |
 |

Installing the Take-up Reel System
|
17
English
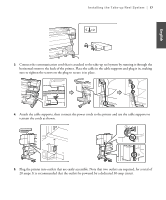
3.
Connect the communication cord that is attached to the take-up reel system by running it through the
horizontal struts to the back of the printer. Place the cable in the cable supports and plug it in, making
sure to tighten the screws on the plug to secure it in place.
4.
Attach the cable supports, then connect the power cords to the printer and use the cable supports to
restrain the cords as shown.
5.
Plug the printer into outlets that are easily accessible. Note that two outlets are required, for a total of
20 amps. It is recommended that the outlets be powered by a dedicated 30-amp circuit.