Epson SureColor S50675 Setup Guide - Page 31
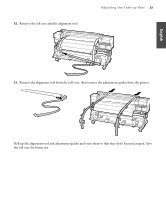
Note the location where the alignment tool crosses the front of the white line on the platen.
 |
View all Epson SureColor S50675 manuals
Add to My Manuals
Save this manual to your list of manuals |
Page 31 highlights
English Adjusting the Take-up Reel | 29 4. Place the alignment tool next to the left adjustment guide and line them up at the front and back of the printer. Then attach the counterweight to the alignment tool. 5. Note the location where the alignment tool crosses the front of the white line on the platen.
-
 1
1 -
2
-
3
-
4
-
5
-
6
-
7
-
8
-
9
-
10
-
11
-
12
-
13
-
14
-
15
-
16
-
17
-
18
-
19
-
20
-
21
-
22
-
23
-
24
-
25
-
 26
26 -
 27
27 -
 28
28 -
 29
29 -
 30
30 -
 31
31 -
 32
32 -
 33
33 -
 34
34 -
 35
35 -
 36
36 -
37
-
38
-
39
-
40
-
41
-
42
-
43
-
44
-
45
-
46
-
47
-
48
-
49
-
50
-
51
-
52
-
53
-
54
-
55
-
56
-
57
-
58
-
59
-
60
-
61
-
62
-
63
-
64
-
65
-
66
-
67
-
68
-
69
-
70
-
71
-
72
-
73
-
74
-
75
-
76
-
77
-
78
-
79
-
80
-
81
-
82
-
83
-
84
-
85
-
86
-
87
-
88
-
89
-
90
-
91
-
92
-
93
-
94
-
95
-
96
-
97
-
98
-
99
-
100
-
101
-
102
-
103
-
104
-
105
-
106
-
107
-
108
-
109
-
110
-
111
-
112
-
113
-
114
-
115
-
116
-
117
-
118
-
119
-
120
-
121
-
122
-
123
-
124
-
125
-
126
-
127
-
128
-
129
-
130
 |
 |

Adjusting the Take-up Reel
|
29
English
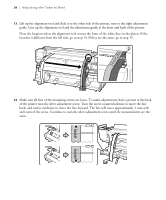
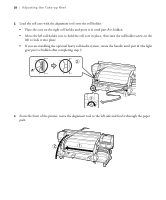
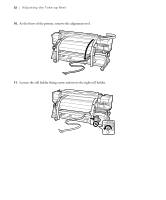
4.
Place the alignment tool next to the left adjustment guide and line them up at the front and back of
the printer. Then attach the counterweight to the alignment tool.
5.
Note the location where the alignment tool crosses the front of the white line on the platen.