Epson TM-S1000 Product Information Guide - Page 4
Ejecting Checks, Installing the Franking Cartridge, Single Pass Check Flow - ink
 |
View all Epson TM-S1000 manuals
Add to My Manuals
Save this manual to your list of manuals |
Page 4 highlights
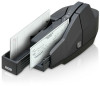
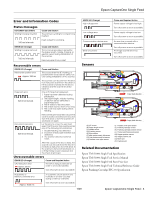
Epson CaptureOne Single Feed 2. You can insert 1 check into the SF to be fed automatically. 3. Insert the check straight facing the outside, as shown below. 2. Remove used franking cartridge, if installed, as shown below. by holding the knob at the top of the cartridge. Knob Ejecting Checks 1. When the checks are ejected, remove them. Main pocket 3. Carefully insert the new franking cartridge from the top, and push it firmly but gently until it clicks into place. Sub pocket Two-pocket model CAUTION: Do not overfill pockets with checks. Otherwise, a paper jam may occur. 2-pocket model = main pocket: 100; sub pocket: 50. 1-pocket model = main pocket: 100. Installing the Franking Cartridge CAUTION: Keep the franking cartridge out of reach of children. Do not disassemble the franking cartridge. Handle carefully because ink stains permanently. Use only genuine Epson cartridges. Do not remove cartridge from packing until ready to use. Use cartridge before expiration date printed on the box. Dispose of cartridge according to applicable regulations. 1. Open the franker cover by pulling the lever forward. 4. Close the franker cover until it clicks into place. Single Pass Check Flow The CaptureOne can perform 4 actions on a document in a single pass: scanning the image of both the face and back, reading magnetic characters, and franking. 1. Insert a document into the feeder section. 2. The scanner scans the images of the face and back. 3. The scanner reads the magnetic characters on the document. 4. The franking section prints a pattern. 5. The document is fed to the outlet. 7/09 Epson CaptureOne Single Feed - 3
-
 1
1 -
 2
2 -
 3
3 -
 4
4 -
 5
5 -
 6
6
 |
 |
