Epson U295P User Manual - Page 5
Unpacking, Control Panel, Removing the Transportation Damper - tm ribbon
 |
UPC - 000031178242
View all Epson U295P manuals
Add to My Manuals
Save this manual to your list of manuals |
Page 5 highlights
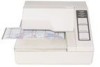
English Unpacking The following items are included with the standard specification printer. If any item is damaged, contact your dealer. ❏ Printer ❏ Damper ❏ Ribbon cassette Control Panel RELEASE button Press this button to insert or remove paper. REVERSE button Feeds paper backward. FORWARD button Feeds paper forward. POWER LED ON when the printer is on. RELEASE LED ON when the printer is in release mode (to insert or remove paper). OFF when the printer is in clamp mode (to hold paper). FLASHES to indicate an error. PAPER OUT LED ON when paper is not inserted or is not inserted correctly. Removing the Transportation Damper The printer is protected during shipping by a transportation damper that you must remove before you 1 turn on the printer. Pull the damper out and remove the strip of tape from the top of the printer, as shown in illustration 1. Note: Prepare the printer to ship or store with these steps: turn on the printer, press the RELEASE button, press the FORWARD button, turn off the printer, and reinstall the transportation damper. TM-U295/TM-U295P User's Manual 3
-
 1
1 -
 2
2 -
 3
3 -
 4
4 -
 5
5 -
 6
6 -
 7
7 -
 8
8
 |
 |
