Epson U295P User Manual - Page 7
Inserting Paper, Troubleshooting - u295
 |
UPC - 000031178242
View all Epson U295P manuals
Add to My Manuals
Save this manual to your list of manuals |
Page 7 highlights
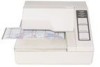
English 9. To put the cover back on the printer, first align the left side of the cover; then insert the tab on the top; then press the bottom until it clicks into place (see illustration 2). Inserting Paper Note: Do not use wrinkled or curled paper. Be sure to use roll paper that meets the specifications. 1. Make sure a ribbon cassette is installed in the printer. 2. Turn on the printer. The POWER light comes on. 3. Press the RELEASE button. The RELEASE light comes on to show that the printer is in release mode. In this mode, paper can be inserted and removed. 4. Insert the paper from either the front or the side, as 5 shown in illustration 5, until the form stopper stops it. Use the markings on the side of the printer to judge how far to insert paper. 5. Check the PAPER OUT light. When you insert the paper correctly, the PAPER OUT light goes out. If the PAPER OUT light is still on, remove the paper and reinsert it. Troubleshooting No lights on the control panel Check that power supply cables are plugged into the printer correctly, the power unit, and power outlet. Make sure power is supplied to the power outlet. If the outlet is controlled by a switch or timer, use another outlet. The PAPER OUT light is on, and nothing is printing Paper is not inserted or is not inserted correctly. The RELEASE light is flashing, and nothing is printed Indicates an error. Turn off the printer, be sure no paper is jammed, and turn it back on. If the RELEASE light still flashes, contact a qualified service person. TM-U295/TM-U295P User's Manual 5
-
 1
1 -
 2
2 -
 3
3 -
 4
4 -
 5
5 -
 6
6 -
 7
7 -
 8
8
 |
 |
