Epson WorkForce 40 Start Here - Page 7
Solving problems, Any questions - troubleshooting
 |
View all Epson WorkForce 40 manuals
Add to My Manuals
Save this manual to your list of manuals |
Page 7 highlights
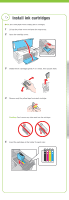
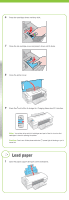
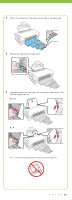
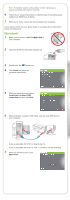
8 Follow the steps on the right side of the screen to add the printer. 9 Click Next again, if necessary. 10 Follow the on-screen instructions to install the rest of the software and register your WorkForce 40 Series. 11 When you're done, eject the CD. You're ready to print! See your Quick Guide or on-screen Epson Information Center for instructions. Solving problems The printer makes noise after ink cartridge installation. • The first time you install ink cartridges, the printer must charge its print head for 2.5 minutes or so. Wait until charging finishes (the power light stops flashing) before you turn off the printer, or it may charge improperly and use excess ink the next time you turn it on. • If the printer stops moving or making noise, but the power light is still flashing after 5 minutes, turn off the printer. If the light is still flashing when you turn it back on, contact Epson as described in "Any questions?". • Turn off the printer, then make sure the ink cartridges are inserted completely and the ink cartridge cover is closed completely. Wait a moment, then turn the printer back on to clear the error. You're having problems installing the printer software. • During software installation, you are prompted to connect the USB cable. When you connect the cable, make sure your printer is turned on and the cable is securely connected at both ends. • Close your other programs, including any screen savers and virus protection software, and install the software again. Any questions? Quick Guide Basic instructions for printing. Network Installation Guide Instructions on configuring the WorkForce 40 Series for a network. On-screen Epson Information Center Click the desktop shortcut for easy access to the WorkForce 40 Series Epson Information Center, FAQs, online troubleshooting advice, and software downloads. You can also purchase paper and ink. On-screen help with your software Select Help or ? when you're using your software. Epson Technical Support Internet Support Visit Epson's support website at epson.com/support and select your product for solutions to common problems. You can download drivers and documentation, get FAQs and troubleshooting advice, or e-mail Epson with your questions.
-
 1
1 -
 2
2 -
 3
3 -
 4
4 -
 5
5 -
 6
6 -
 7
7 -
 8
8
 |
 |
