Epson WorkForce Pro WF-4830 Users Guide - Page 190
Additional Scanning Settings - Advanced Settings Tab
 |
View all Epson WorkForce Pro WF-4830 manuals
Add to My Manuals
Save this manual to your list of manuals |
Page 190 highlights
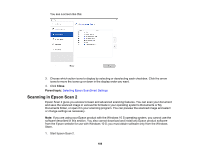
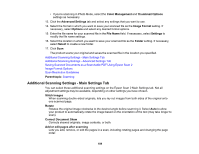
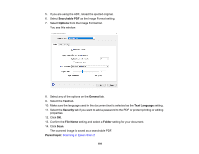
Note: To save multiple pages in a single file, you must select a file format that supports multiple pages such as PDF or Multi-TIFF. If you select another file format, each scanned image or page is saved as a separate file. Parent topic: Scanning in Epson Scan 2 Additional Scanning Settings - Advanced Settings Tab You can select these additional scanning settings on the Epson Scan 2 Advanced Settings tab. Not all adjustment settings may be available, depending on other settings you have chosen. Remove Background Removes the background of the originals. Saturation Adjusts the density of colors in the overall image. Color Restoration Corrects color in faded images (when scanning in Photo Mode). Backlight Correction Lightens darkly backlit images (when scanning in Photo Mode). Correct Document Skew Corrects skewed originals, image contents, or both. Parent topic: Scanning in Epson Scan 2 Saving Scanned Documents as a Searchable PDF Using Epson Scan 2 You can scan a document and save the text in a searchable PDF. In a searchable PDF, text is recognized using Optical Character Recognition (OCR) and then embedded in the scanned original. Note: The required Epson Scan 2 OCR Component Pro is installed automatically when you install your product software as instructed on the Start Here sheet. If you install your scanner software programs individually, be sure to also install this component using the Epson Software Updater if you want to perform OCR. 1. Load your original in the product for scanning. 2. Start Epson Scan 2. 3. Select your scan settings. 4. Click Preview and adjust the area you want to scan, if necessary. 190
-
 1
1 -
2
-
3
-
4
-
5
-
6
-
7
-
8
-
9
-
10
-
11
-
12
-
13
-
14
-
15
-
16
-
17
-
18
-
19
-
20
-
21
-
22
-
23
-
24
-
25
-
26
-
27
-
28
-
29
-
30
-
31
-
32
-
33
-
34
-
35
-
36
-
37
-
38
-
39
-
40
-
41
-
42
-
43
-
44
-
45
-
46
-
47
-
48
-
49
-
50
-
51
-
52
-
53
-
54
-
55
-
56
-
57
-
58
-
59
-
60
-
61
-
62
-
63
-
64
-
65
-
66
-
67
-
68
-
69
-
70
-
71
-
72
-
73
-
74
-
75
-
76
-
77
-
78
-
79
-
80
-
81
-
82
-
83
-
84
-
85
-
86
-
87
-
88
-
89
-
90
-
91
-
92
-
93
-
94
-
95
-
96
-
97
-
98
-
99
-
100
-
101
-
102
-
103
-
104
-
105
-
106
-
107
-
108
-
109
-
110
-
111
-
112
-
113
-
114
-
115
-
116
-
117
-
118
-
119
-
120
-
121
-
122
-
123
-
124
-
125
-
126
-
127
-
128
-
129
-
130
-
131
-
132
-
133
-
134
-
135
-
136
-
137
-
138
-
139
-
140
-
141
-
142
-
143
-
144
-
145
-
146
-
147
-
148
-
149
-
150
-
151
-
152
-
153
-
154
-
155
-
156
-
157
-
158
-
159
-
160
-
161
-
162
-
163
-
164
-
165
-
166
-
167
-
168
-
169
-
170
-
171
-
172
-
173
-
174
-
175
-
176
-
177
-
178
-
179
-
180
-
181
-
182
-
183
-
184
-
 185
185 -
 186
186 -
 187
187 -
 188
188 -
 189
189 -
 190
190 -
 191
191 -
 192
192 -
 193
193 -
 194
194 -
 195
195 -
196
-
197
-
198
-
199
-
200
-
201
-
202
-
203
-
204
-
205
-
206
-
207
-
208
-
209
-
210
-
211
-
212
-
213
-
214
-
215
-
216
-
217
-
218
-
219
-
220
-
221
-
222
-
223
-
224
-
225
-
226
-
227
-
228
-
229
-
230
-
231
-
232
-
233
-
234
-
235
-
236
-
237
-
238
-
239
-
240
-
241
-
242
-
243
-
244
-
245
-
246
-
247
-
248
-
249
-
250
-
251
-
252
-
253
-
254
-
255
-
256
-
257
-
258
-
259
-
260
-
261
-
262
-
263
-
264
-
265
-
266
-
267
-
268
-
269
-
270
-
271
-
272
-
273
-
274
-
275
-
276
-
277
-
278
-
279
-
280
-
281
-
282
-
283
-
284
-
285
-
286
-
287
-
288
-
289
-
290
-
291
-
292
-
293
-
294
-
295
-
296
-
297
-
298
-
299
-
300
-
301
-
302
-
303
-
304
-
305
-
306
-
307
-
308
-
309
-
310
-
311
-
312
-
313
-
314
-
315
-
316
-
317
-
318
-
319
-
320
-
321
-
322
-
323
-
324
-
325
-
326
-
327
-
328
-
329
-
330
-
331
-
332
-
333
-
334
-
335
-
336
-
337
-
338
-
339
-
340
-
341
-
342
-
343
-
344
-
345
-
346
-
347
-
348
-
349
-
350
-
351
-
352
-
353
-
354
-
355
-
356
-
357
-
358
-
359
-
360
-
361
-
362
-
363
-
364
-
365
-
366
-
367
-
368
-
369
-
370
-
371
-
372
-
373
-
374
-
375
 |
 |
