Epson WorkForce WF-2540 User Guide - Page 95
Available Document Source Settings - Office Mode
 |
View all Epson WorkForce WF-2540 manuals
Add to My Manuals
Save this manual to your list of manuals |
Page 95 highlights
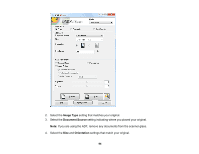
5. Select the Resolution setting you want to use for your scan. 6. Click the Preview button. Epson Scan previews your original and displays the result in a separate Preview window. 7. If you are using the ADF, reinsert your original into the ADF. 8. If desired, select the area in your preview image that you want to scan (scan area). 9. Select any of the image adjustment settings you want to use. Before making adjustments, click the image or scan area in the Preview window. 10. Click Scan. You see the File Save Settings window. 11. Change any of the necessary file save settings and click OK. Epson Scan scans your original, and saves the file in the selected folder or opens it in your scanning program. If the file was saved directly to your computer, you see the file in the Windows Explorer or Mac OS X Finder, where you can view and print the image, if desired. Available Document Source Settings - Office Mode Selecting a Scan Area - Office Mode Available Image Adjustments - Office Mode Parent topic: Selecting Epson Scan Settings Related concepts Scan Resolution Guidelines Related tasks Selecting Scan File Settings Available Document Source Settings - Office Mode You can select these Document Source options in Epson Scan Office Mode. Auto Detect Automatically detects where the originals are placed on your product for scanning. ADF Selects the Automatic Document Feeder as the location where the originals are placed on your product for scanning. Document Table Selects the scanner glass as the location where the originals are placed on your product for scanning. Parent topic: Scanning in Office Mode 95
-
 1
1 -
2
-
3
-
4
-
5
-
6
-
7
-
8
-
9
-
10
-
11
-
12
-
13
-
14
-
15
-
16
-
17
-
18
-
19
-
20
-
21
-
22
-
23
-
24
-
25
-
26
-
27
-
28
-
29
-
30
-
31
-
32
-
33
-
34
-
35
-
36
-
37
-
38
-
39
-
40
-
41
-
42
-
43
-
44
-
45
-
46
-
47
-
48
-
49
-
50
-
51
-
52
-
53
-
54
-
55
-
56
-
57
-
58
-
59
-
60
-
61
-
62
-
63
-
64
-
65
-
66
-
67
-
68
-
69
-
70
-
71
-
72
-
73
-
74
-
75
-
76
-
77
-
78
-
79
-
80
-
81
-
82
-
83
-
84
-
85
-
86
-
87
-
88
-
89
-
 90
90 -
 91
91 -
 92
92 -
 93
93 -
 94
94 -
 95
95 -
 96
96 -
 97
97 -
 98
98 -
 99
99 -
 100
100 -
101
-
102
-
103
-
104
-
105
-
106
-
107
-
108
-
109
-
110
-
111
-
112
-
113
-
114
-
115
-
116
-
117
-
118
-
119
-
120
-
121
-
122
-
123
-
124
-
125
-
126
-
127
-
128
-
129
-
130
-
131
-
132
-
133
-
134
-
135
-
136
-
137
-
138
-
139
-
140
-
141
-
142
-
143
-
144
-
145
-
146
-
147
-
148
-
149
-
150
-
151
-
152
-
153
-
154
-
155
-
156
-
157
-
158
-
159
-
160
-
161
-
162
-
163
-
164
-
165
-
166
-
167
-
168
-
169
-
170
-
171
-
172
-
173
-
174
-
175
-
176
-
177
-
178
-
179
-
180
-
181
-
182
-
183
-
184
-
185
-
186
-
187
-
188
-
189
-
190
-
191
-
192
-
193
-
194
-
195
-
196
-
197
-
198
-
199
-
200
-
201
-
202
-
203
-
204
-
205
-
206
-
207
-
208
-
209
-
210
-
211
-
212
-
213
-
214
-
215
-
216
-
217
-
218
-
219
-
220
-
221
-
222
-
223
-
224
-
225
-
226
-
227
-
228
-
229
-
230
-
231
-
232
-
233
-
234
-
235
-
236
-
237
-
238
-
239
-
240
-
241
-
242
-
243
-
244
-
245
-
246
-
247
-
248
-
249
-
250
-
251
-
252
-
253
-
254
-
255
-
256
-
257
-
258
-
259
-
260
-
261
-
262
-
263
-
264
-
265
-
266
-
267
-
268
-
269
-
270
-
271
-
272
-
273
-
274
-
275
-
276
-
277
-
278
-
279
-
280
-
281
-
282
-
283
 |
 |
