Epson XP-600 Quick Guide - Page 9
Copying a Document or Photo - ink for
 |
View all Epson XP-600 manuals
Add to My Manuals
Save this manual to your list of manuals |
Page 9 highlights
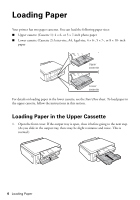
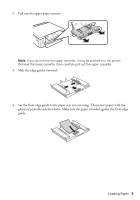
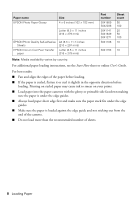
Copying a Document or Photo Follow the steps in this section to position your originals correctly on the scanner glass and make color or black-and-white copies. 1. Make sure paper is loaded in one of the paper cassettes (see page 4). 2. Open the document cover and place your original facedown on the scanner glass, with the bottom against the front-right corner. 3. Close the cover gently so you don't move the original. 4. Press if necessary, press l or r to select Copy, then press OK. You see this screen: 5. Press + or - to select the number of copies you want (up to 99). 6. Press l or r to select Color or B&W (black-and-white) copies. 7. Press u or d, select Paper and Copy Settings, then press OK to view additional copy settings. 8. Press u or d to select a copy setting, then press l or r to change the selected setting. Note: To clear previously used copy settings, press y. For more information about copy settings, see your online User's Guide. 9. When you're ready to copy, press x. To cancel copying, press y. Note: When printing two-sided, if ink on the front of the paper smears, select a longer Dry Time setting. Copying a Document or Photo 9
-
 1
1 -
2
-
3
-
 4
4 -
 5
5 -
 6
6 -
 7
7 -
 8
8 -
 9
9 -
 10
10 -
 11
11 -
 12
12 -
 13
13 -
 14
14 -
15
-
16
-
17
-
18
-
19
-
20
-
21
-
22
-
23
-
24
-
25
-
26
-
27
-
28
-
29
-
30
-
31
-
32
-
33
-
34
-
35
-
36
-
37
-
38
-
39
-
40
 |
 |
