Fisher and Paykel CG365DWACX1 CG365 Gas Cooktops USer Guide & Installation - Page 16
Important
 |
View all Fisher and Paykel CG365DWACX1 manuals
Add to My Manuals
Save this manual to your list of manuals |
Page 16 highlights
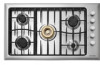
US 14 Installation instructions CA (EN) Converting to a different gas type Changing the injectors The cooktop is set to NG. A conversion kit to LP is supplied with the cooktop. To change the injectors, you will need a 9⁄32" (7 mm) box spanner (and a 13⁄32" (10 mm) ring spanner for CG365D models). 1 Turn off the cooktop and disconnect from the power supply. Important! Disconnect cooktop from the power supply before continuing. 2 Make sure all gas valves are turned off. 3 Remove all grates and burner parts. 4 Unscrew the injectors (save for future use) and replace them with the correct ones (size numbers are stamped on the side, eg 70= 0.70 mm). See Fig. 1. CG365D wok burner only 5 Remove the 2 screws holding each burner bowl (3 on the wok burner). 6 Lift hob tray from the product. Important! Beware of sharp edges. 7 Replace the wok injector with the correct lifting off one using a 13⁄32" (10 mm) ring spanner. 8 Reset the venturi (see Fig. 2): With the product isolated from the electrical supply, ignite the burner using a match. The flame will probably be lifting off the burner (see Fig. 3). Loosen the venturi securing screw. Move the venturi towards the injector until the Fig.3 flame begins to 'yellow tip' (see Fig. 4). Move the venturi back until the 'yellow tip' just disappears (see Fig. 5)-this is the correct venturi setting. Tighten the securing screw. good flame 9 To refit the hob tray, repeat steps 5 & 6 in reverse. 10 Reset the minimum setting (see 'Minimum setting or turn-down'). 11 After reassembly, verify the insulation resistance and ground continuity of the electrical circuit. 12 The label supplied with the injectors should be placed over the existing gas type label to indicate the change. Fig.1 venturi Fig.2 yellow tip Fig.4 Fig.5
-
 1
1 -
2
-
3
-
4
-
5
-
6
-
7
-
8
-
9
-
10
-
 11
11 -
 12
12 -
 13
13 -
 14
14 -
 15
15 -
 16
16 -
 17
17 -
 18
18 -
 19
19 -
 20
20 -
 21
21 -
22
-
23
-
24
-
25
-
26
-
27
-
28
-
29
-
30
-
31
-
32
-
33
-
34
-
35
-
36
-
37
-
38
-
39
-
40
-
41
-
42
-
43
-
44
-
45
-
46
-
47
-
48
-
49
-
50
-
51
-
52
-
53
-
54
-
55
-
56
-
57
-
58
-
59
-
60
 |
 |
