Fisher and Paykel CG365DWACX1 CG365 Gas Cooktops USer Guide & Installation - Page 25
Care and cleaning
 |
View all Fisher and Paykel CG365DWACX1 manuals
Add to My Manuals
Save this manual to your list of manuals |
Page 25 highlights
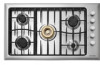
Care and cleaning 23 US CA (EN) Important! Before cleaning, be certain the burners are turned off and the whole cooktop is cool. Do not use a steam cleaner to clean your cooktop. Use soapy water and a soft sponge or cloth to clean the cooktop, rinse with clean water and dry thoroughly. Clean the cooktop regularly, before spills become burnt on. Soaking stubborn stains under the soapy cloth for a few minutes will help make them easier to remove. Grates are dishwasher safe. If stubborn soil remains, follow the recommended cleaning methods outlined below. Always use the mildest cleaner that will do the job. Use clean, soft cloths, sponges or paper towels. Clean brushed stainless steel finishes in the direction of the grain. Dry thoroughly to avoid water marks. Do not clean cooktop parts in any self-cleaning oven. After cleaning, replace all cooktop parts in their proper position before using the cooktop. Rinse and wipe away all cleaner residue as-when heated-the cleaners can permanently stain the cooktop. Replacing the grates The wok grate goes in the center over the wok burner. The other two grates are interchangeable. Rounded corners Reassembling the brass wok burner (GC365D only) Each part of the brass burner has locating pins to help you to assemble it correctly after cleaning. Incorrect assembly can cause dangerous irregular flames and ignition problems. Refer to this diagram for the correct order of assembly. Note: the brass parts of your wok burner will change color with use. This will have no effect on the performance. Inner cap Correct grate orientation Outer cap (small holes) Trim ring Side view Rotate vent ring to align locater pin with hole in burner base. Vent ring with locater pins (large holes) Align and insert pin
-
 1
1 -
2
-
3
-
4
-
5
-
6
-
7
-
8
-
9
-
10
-
11
-
12
-
13
-
14
-
15
-
16
-
17
-
18
-
19
-
 20
20 -
 21
21 -
 22
22 -
 23
23 -
 24
24 -
 25
25 -
 26
26 -
 27
27 -
 28
28 -
 29
29 -
 30
30 -
31
-
32
-
33
-
34
-
35
-
36
-
37
-
38
-
39
-
40
-
41
-
42
-
43
-
44
-
45
-
46
-
47
-
48
-
49
-
50
-
51
-
52
-
53
-
54
-
55
-
56
-
57
-
58
-
59
-
60
 |
 |
