Fluke 287 Fluke 287 and 289 Multimeter Users Manual - Page 15
Features, Understanding the Push Buttons - true rms
 |
View all Fluke 287 manuals
Add to My Manuals
Save this manual to your list of manuals |
Page 15 highlights
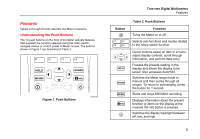
Features Tables 2 through 5 briefly describe the Meter's features. Understanding the Push Buttons The 14 push buttons on the front of the Meter activate features that augment the function selected using the rotary switch, navigate menus or control power to Meter circuits. The buttons shown in Figure 1 are described in Table 2. Figure 1. Push Buttons est02.emf True-rms Digital Multimeters Features Table 2. Push Buttons Button O Function Turns the Meter on or off. 12 Selects sub-functions and modes related 34 to the rotary switch function. Cursor buttons select an item in a menu, adjust display contrast, scroll through information, and perform data entry. H Freezes the present reading in the display and allows the display to be saved. Also accesses AutoHold. R M Switches the Meter range mode to manual and then cycles through all ranges. To return to autoranging, press the button for 1 second. Starts and stops MIN MAX recording. I Displays information about the present function or items on the display at the moment the info button is pressed. G Switches the display backlight between off, low, and high. 5
-
 1
1 -
2
-
3
-
4
-
5
-
6
-
7
-
8
-
9
-
 10
10 -
 11
11 -
 12
12 -
 13
13 -
 14
14 -
 15
15 -
 16
16 -
 17
17 -
 18
18 -
 19
19 -
 20
20 -
21
-
22
-
23
-
24
-
25
-
26
-
27
-
28
-
29
-
30
-
31
-
32
-
33
-
34
-
35
-
36
-
37
-
38
-
39
-
40
-
41
-
42
-
43
-
44
-
45
-
46
-
47
-
48
-
49
-
50
-
51
-
52
-
53
-
54
-
55
-
56
-
57
-
58
-
59
-
60
-
61
-
62
-
63
-
64
-
65
-
66
-
67
-
68
-
69
-
70
-
71
-
72
-
73
-
74
-
75
-
76
-
77
-
78
-
79
-
80
-
81
-
82
-
83
-
84
-
85
-
86
-
87
-
88
 |
 |
