Fluke Ti300 User Manual - Page 16
Optional 12 V Vehicle Charger, Power On and Off, Operation in Extreme Conditions
 |
View all Fluke Ti300 manuals
Add to My Manuals
Save this manual to your list of manuals |
Page 16 highlights
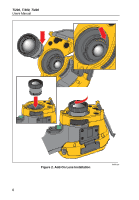
Ti200, Ti300, Ti400 Users Manual Optional 12 V Vehicle Charger 1. Connect the 12 V adapter into the 12 V accessory socket of the vehicle. 2. Connect the output to the ac power socket of the Imager. 3. Charge until the indicator shows full on the screen. 4. Disconnect the 12 V adapter and Imager when battery is fully charged. Caution To prevent damage to the Imager, remove it from the DC car charger before you start or jump start the vehicle. Power On and Off To turn on or turn off the Imager, push and hold for two seconds, see Table . The Imager has Power Save and Auto Off features. See page 36 for more information about how to set these features. Note All thermal imagers need sufficient warm-up time for the most accurate temperature measurements and best image quality. This time can often vary by model and by environmental conditions. Although most imagers are fully warmed up in 3-5 minutes, it is always best to wait a minimum of 10 minutes if the most accurate temperature measurement is very important to your application. When you move an Imager between environments with large differences in ambient temperature, more adjustment time can be required. Operation in Extreme Conditions Storage and/or continual operation of the Imager in extreme ambient temperature conditions can result in temporary interruption of operation. If this occurs, let the Imager stabilize (cool down or warm up) before you resume operation. 10
-
 1
1 -
2
-
3
-
4
-
5
-
6
-
7
-
8
-
9
-
10
-
 11
11 -
 12
12 -
 13
13 -
 14
14 -
 15
15 -
 16
16 -
 17
17 -
 18
18 -
 19
19 -
 20
20 -
 21
21 -
22
-
23
-
24
-
25
-
26
-
27
-
28
-
29
-
30
-
31
-
32
-
33
-
34
-
35
-
36
-
37
-
38
-
39
-
40
-
41
-
42
-
43
-
44
-
45
-
46
-
47
-
48
-
49
-
50
-
51
-
52
-
53
-
54
 |
 |
