Frigidaire FAK085R7V Installation Instructions (All Languages) - Page 7
Alternate Window Jamb, Applications - installation
 |
UPC - 012505272028
View all Frigidaire FAK085R7V manuals
Add to My Manuals
Save this manual to your list of manuals |
Page 7 highlights
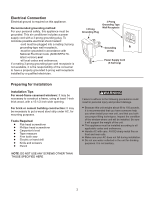
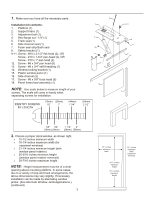
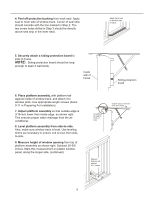
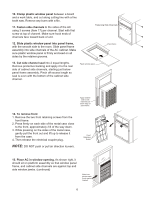
16. Slide inner window sash firmly against side of the cabinet. Make sure not to peel the seal strips from the window track and cabinet side channels. If the panel frame does not fit snugly to the inner window sash, secure the panel frame to the sash with #8x3/4-inch screws, or #8-32x3/4-inch selfthreading screws. Use the partially plugged holes in the panel frame. Drill 1/8-inch pilot holes for the screws. 17. Hook the safety bracket over the base of the unit and fasten it to the front of the platform assembly. Use a #8-32x3/4-inch self-threading screw. NOTE: The bracket prevents movement of the air conditioner (either in or out) after completing the installation. Slide inner window sash firmly against Cabinet. Install safety bracket 18. Stuff the foam seal strip/sash seal between the vertical sash and the window glass, as shown right. 19. Use the window locking bracket to lock the inner window sash to the base of the outer window sash. Use one #8x3/4-inch screw, or #8-32x3/4inch self-threading screw. (Drill 1/8-inch pilot hole). 20. To replace the front First reconnect the coupler plugs, make the exhaust control positioned through the front in the proper location. Gently push the front into position on the cabinet. It should click into place. Then replace the retaining screws that holds the panel in place. Do not push or pull the front panel louvers. Alternate Window Jamb Applications To install in windows having no flanges or wood stops on the top and side jambs, the channels and panel frame must fit against a mating flange (or 1/16-inch max. thick angle) attached to the window jambs. Figure A shows this angle installed. Figures B & C show alternate treatments. On the sash side of the opening, the leading corner of the inner sash becomes the flange. You can purchase the angle strip locally. Sash seal Window locking bracket Room A Add angle to wood stop Safety bracket Flush Room B Add wood as shown Room C Add 16- or 18gauge angle 7
-
 1
1 -
 2
2 -
 3
3 -
 4
4 -
 5
5 -
 6
6 -
 7
7 -
 8
8 -
 9
9 -
 10
10
 |
 |
