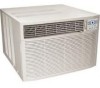
Frigidaire FAS255P2A Installation Instructions - Page 4
Remove the Air Conditioner - installation
 |
View all Frigidaire FAS255P2A manuals
Add to My Manuals
Save this manual to your list of manuals |
Page 4 highlights
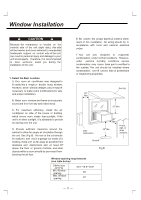
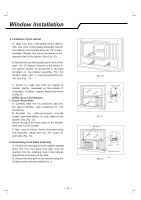
Window Installation 2. Preparation to Remove the Air Conditioner From Slide-Out Chassis A. Place unit on floor, remove total of (4) Philips screws securing the chassis to the cabinet. There are (2) screws on each side. The set of screws closest to the front of the unit secure the front panel to the cabinet. The set of screws closest to the rear of the unit secure the cabinet to the chassis. See (Fig. 1). NOTE: Screws must be reinstalled upon completion of the window installation to secure slide-out chassis. B. Remove the front panel assembly from the cabinet by gently pulling it. C. Grasp the pull handle at the front of the slide-out chassis and carefully slide the air conditioner out of the cabinet. See (Fig. 2). NOTE: Avoid touching coil in case of injury or damage.. 3. Assemble of the top channel to the cabinet Stick the double sided seal to the top channel, and then Install it to the cabinet as shown in (Fig. 3) using (5) 1/4" screws. 4. Assemble of the accordions to the cabinet. Slide the accordions into the top and bottom channels as shown in (Fig. 4). The accordions are identified (on each frame) as "left" & "right". Attach the accordions to the cabinet using (4) 1/4" screws on each side. Right side Philips screws Fig. 1 Coil Chassis Pull Handle Fig. 2 Double sided seal 1/4" Screws (5) Top Rail Fig. 3 Accordion 1/4" screws Right Side Fig. 4 4
-
 1
1 -
 2
2 -
 3
3 -
 4
4 -
 5
5 -
 6
6 -
 7
7 -
 8
8 -
 9
9 -
 10
10
 |
 |
