Frigidaire FAS255P2A Installation Instructions - Page 9
Prepare and Install Cabinet
 |
View all Frigidaire FAS255P2A manuals
Add to My Manuals
Save this manual to your list of manuals |
Page 9 highlights
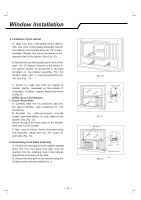
NOTE: If wall thickness is 8-1/2'' or more, add aluminum flashing over bottom of frame opening to assure no water can enter area between inner and outer wall. CAULK AS REQUIRED 4. OPTIONAL: Support brackets may be used. Installation brackets are recommended for walls under 5'' thick. Refer to Step 4 of Window Mounting for assembly of support brackets. A wooden strip nailed to the outside wall should be used in conjunction with sill support angle brackets. FIG. 2 1" LONG WOOD SCREW ALUMINUM FLASHING OVER BOTTOM OF FRAME OVER 8-1/2" Prepare and Install Cabinet 1. Slide chassis from cabinet. Refer back to Step 2 of Window Mounting. 2. Place cabinet into opening with bottom rail resting firmly on bottom board of wooden frame. 3. Position cabinet to achieve proper slope for water removal. (See FIG. 1 below.) 5. Secure bottom rail to wood frame with two large wood screws 1''(2.5 cm) long using the two holes in the bottom of the channel resting on frame. (See FIG. 2 following) 5/16" TO 3/8" LEVEL 3/4" PLUS TRIM THICKNESS SEE STEP 5 Support bracket Solid Piece Wood (If required) 6. Screw or nail cabinet wooden frame using shims if frame is oversized, to eliminate distortion. Remember to maintain proper slope as described in Step 3. 7. Install chassis into cabinet by following all steps in Step 8 of Window Mounting. (Continued) 9
-
 1
1 -
2
-
3
-
 4
4 -
 5
5 -
 6
6 -
 7
7 -
 8
8 -
 9
9 -
 10
10
 |
 |
