Frigidaire FCCI3627AB Complete Owners Guide - Page 15
Setting Surface Controls
 |
View all Frigidaire FCCI3627AB manuals
Add to My Manuals
Save this manual to your list of manuals |
Page 15 highlights
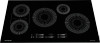
Cooktop Controls 7 2 LOCK ON OFF 1 1 POWER ON OFF 1 4 35 6 15 SETTING SURFACE CONTROLS 8 9P 9P Timer 8a 8c ON/OFF 8b ON OFF 1 9 9P LOCK POWER ON OFF 1 ON OFF 1 9P 9P ON OFF 1 Timer ON/OFF 9P ON OFF 1 ON OFF 1 9P 9P 1. Power: Press to turn on or turn off the cooktop. 2. Lock: Lock the cooktop controls to prevent accidental activation of cooking zones. 3. Cooking Zone Indicator: The LEDs (4 or 5 depending on the model) indicate cook zones. The one corresponding to the control's cook zone turns red. 4. TempLock: Activates TempLock feature. When pressed, this feature uses a temperature sensor to monitor heat and adjust the power to maintain a consistent temperature during cooking. See page 17. 5. Cooking Zone On/Off: When cookware is on the cooking zone, press to turn the zone ON/ OFF. 6. Cooking Zone Power Level: Slide a finger across or press a number to set the power level. Level 1 is low, level 9 is high, and P is the most powerful setting. 7. Bridge: The Bridge indicator is visible on Zone 1 if both left cooking zones detect cookware. The Bridge function makes the two left cooking zones work together to heat a long piece of cookware, like a griddle. 8. Timer Indicator: Shows the time currently left on the timer. 9. Serve Warm: Activates the Serve Warm feature. a. Reduce Time (-): Press to reduce the amount of time on the timer. b. Timer On/Off: Press to turn the countdown timer on or off. c. Increase Time (+): Press to increase the amount of time on the timer. Serve Warm will set all of the cooking zones to a low power level to keep foods warm.
-
 1
1 -
2
-
3
-
4
-
5
-
6
-
7
-
8
-
9
-
 10
10 -
 11
11 -
 12
12 -
 13
13 -
 14
14 -
 15
15 -
 16
16 -
 17
17 -
 18
18 -
 19
19 -
 20
20 -
21
-
22
-
23
-
24
-
25
 |
 |
