Frigidaire FEQ1442ES Installation Instructions - Page 5
Mobile Home Installation, Reversing Door Swing - dryer
 |
UPC - 012505373824
View all Frigidaire FEQ1442ES manuals
Add to My Manuals
Save this manual to your list of manuals |
Page 5 highlights
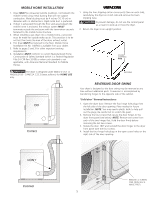
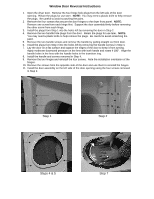
MOBILE HOME INSTALLATION 1. Dryer MUST be exhausted outside (outdoors, not beneath the mobile home) using metal ducting that will not support combustion. Metal ducting must be 4 inches (10.16 cm) in diameter with no obstructions. Rigid metal duct is preferred. 2. If dryer is exhausted through the floor and area beneath the mobile home is enclosed, the exhaust system MUST terminate outside the enclosure with the termination securely fastened to the mobile home structure. 3. When installing a gas dryer into a mobile home, a provision must be made for outside make up air. This provision is to be not less than twice the area of the dryer exhaust outlet. 4. This dryer MUST be fastened to the floor. Mobile Home Installation Kit No. 346764 is available from your dealer. 5. Refer to pages 2 and 3 for other important venting requirements. 6. Installation MUST conform to current Manufactured Home Construction & Safety Standard (which is a Federal Regulation Title 24 CFR-Part 32-80) or when such standard is not applicable, with American National Standard for Mobile Homes. UNPACKING 1. Using the four shipping carton corner posts (two on each side), carefully lay the dryer on its left side and remove the foam shipping base. To prevent damage, do not use the control panel as a means to pick up or move the dryer. 2. Return the dryer to an upright position. FOAM SHIPPING PAD The dryer is designed under ANSI Z 21.5.1 or ANSI/UL2158 - CAN/CSA C22.2 (latest editions) for HOME USE only. PACKING REVERSING DOOR SWING Your dryer is designed so the door swing may be reversed at any time without additional parts. Conversion is accomplished by transferring hinges to the opposite side of the cabinet. "Solid door " Reversal Instructions: 1. Open the dryer door. Remove the four hinge hole plugs from the left side of the door opening. Place nearby for future installation. NOTE: You may need a plastic knife to help pull out the plugs. Be careful not to scratch the paint. 2. Remove the four screws that secure the door hinges to the dryer front panel (see below). NOTE: Remove one screw from each of the two hinges first. Hold the door firmly before removing the last two screws. 3. Rotate the door 180° and reinstall the door hinges to the dryer front panel with the four screws. 4. Install the four hinge hole plugs in the open screw holes on the right side of the door opening. REMOVE 4 SCREWS (ONE FROM EACH HINGE FIRST) 5
-
 1
1 -
 2
2 -
 3
3 -
 4
4 -
 5
5 -
 6
6 -
 7
7 -
 8
8 -
 9
9 -
 10
10 -
 11
11 -
12
-
13
-
14
-
15
-
16
 |
 |
