Frigidaire FEQ1442ES Installation Instructions - Page 6
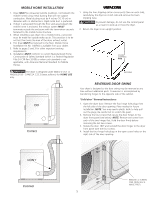
Window Door Reversal Instructions
 |
UPC - 012505373824
View all Frigidaire FEQ1442ES manuals
Add to My Manuals
Save this manual to your list of manuals |
Page 6 highlights
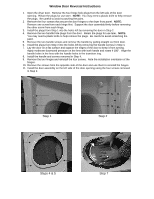
Window Door Reversal Instructions 1. Open the dryer door. Remove the four hinge hole plugs from the left side of the door opening. Retain the plugs for use later. NOTE: You may need a plastic knife to help remove the plugs. Be careful to avoid scratching the paint. 2. Remove the four screws that secure the door hinges to the dryer front panel. NOTE: Remove one screw from each hinge first. Support the door assembly firmly before removing the other screw from each hinge. 3. Install the plugs from Step 1 into the holes left by removing the door in Step 2. 4. Remove the two handle hole plugs from the door. Retain the plugs for use later. NOTE: You may need a plastic knife to help remove the plugs. Be careful to avoid scratching the paint. 5. Remove the two handle screws and remove the handle by pulling straight out from door. 6. Install the plugs from Step 3 into the holes left by removing the handle screws in Step 4. 7. Lay the door on a flat surface and support the edges of the door to keep it from turning. Apply moderate downward pressure on the lens with both hands and rotate it 180°. Align the handle holes in the lens with the handle holes in the transition ring. 8. Install the handle and screws removed in Step 4. 9. Remove the two hinges and reinstall the four screws. Note the installation orientation of the hinges. 10. Remove the screws from the opposite side of the door and use them to reinstall the hinges. 11. Install the door assembly on the left side of the door opening using the four screws removed in Step 2. Step 1 Step 2 Steps 4 & 5 Step 7
-
 1
1 -
 2
2 -
 3
3 -
 4
4 -
 5
5 -
 6
6 -
 7
7 -
 8
8 -
 9
9 -
 10
10 -
 11
11 -
 12
12 -
13
-
14
-
15
-
16
 |
 |
