Frigidaire FFAD3533W1 Complete Owners Guide - Page 8
Removing Collected Water
 |
View all Frigidaire FFAD3533W1 manuals
Add to My Manuals
Save this manual to your list of manuals |
Page 8 highlights
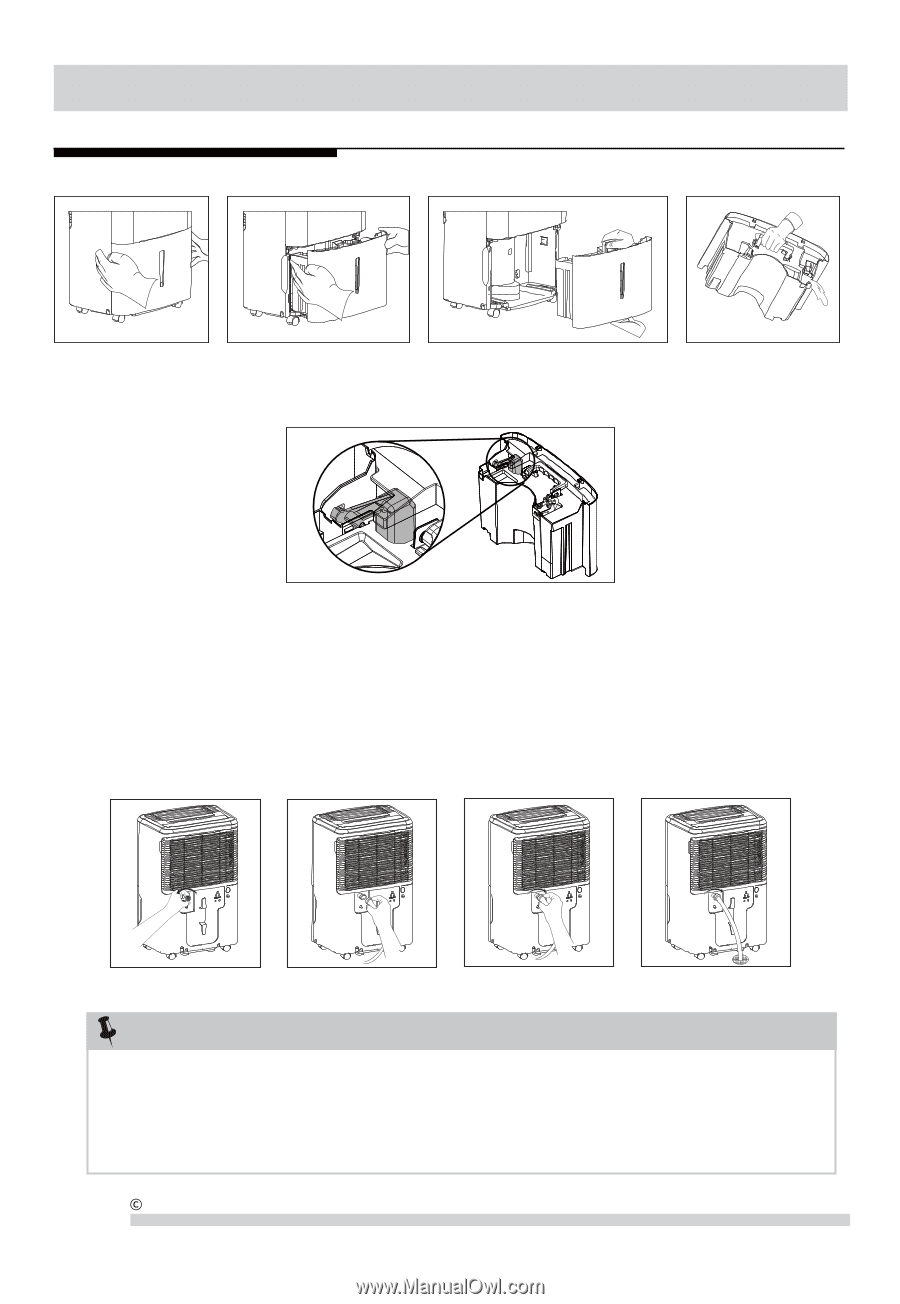
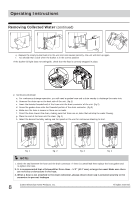
Operating Instructions Removing Collected Water (continued) e. Replace the empty bucket back into the unit and once seated correctly, the unit will start up again. f. You should hear a click when the bucket is in the correct position If the bucket full light does not extinguish, check that the float is correctly snapped in place. 2. Continuous Drainage: a. For continuous drainage operation, you will need a garden hose and a drain nearby to discharge the water into. b. Unscrew the drain cap on the back side of the unit. (fig.1) c. Insert the female threaded end of the hose onto the drain connector of the unit. (fig.2) d. Screw the garden hose onto the threaded portion of the drain connector. (fig.3) e. Make sure the hose is secure so there are no leaks. f. Direct the hose toward the drain, making sure that there are no kinks that will stop the water flowing. g. Place the end of the hose into the drain. (fig.4) h. Select the desired humidity setting and fan speed on the unit for continuous draining to start. fig. 1 fig. 2 fig. 3 fig. 4 NOTE: 1. Check the seal between the hose and the drain connector. If there is a small leak then replace the hose gasket and re-tighten the hose. 2. It is recommended that a Dehumidifier Drain Hose - 1/2" (12.7 mm) or larger be used. Make sure there are no kinks or elevations in the hose. 3. When a hose is not attached to the drain connector, please ensure drain cap is screwed securely to the connector to prevent leakages 8 2019 Electrolux Home Products, Inc. All rights reserved.
-
 1
1 -
2
-
 3
3 -
 4
4 -
 5
5 -
 6
6 -
 7
7 -
 8
8 -
 9
9 -
 10
10 -
 11
11
 |
 |