Frigidaire FGBM185KW Complete Owner's Guide (English) - Page 27
Caution
 |
UPC - 012505560309
View all Frigidaire FGBM185KW manuals
Add to My Manuals
Save this manual to your list of manuals |
Page 27 highlights
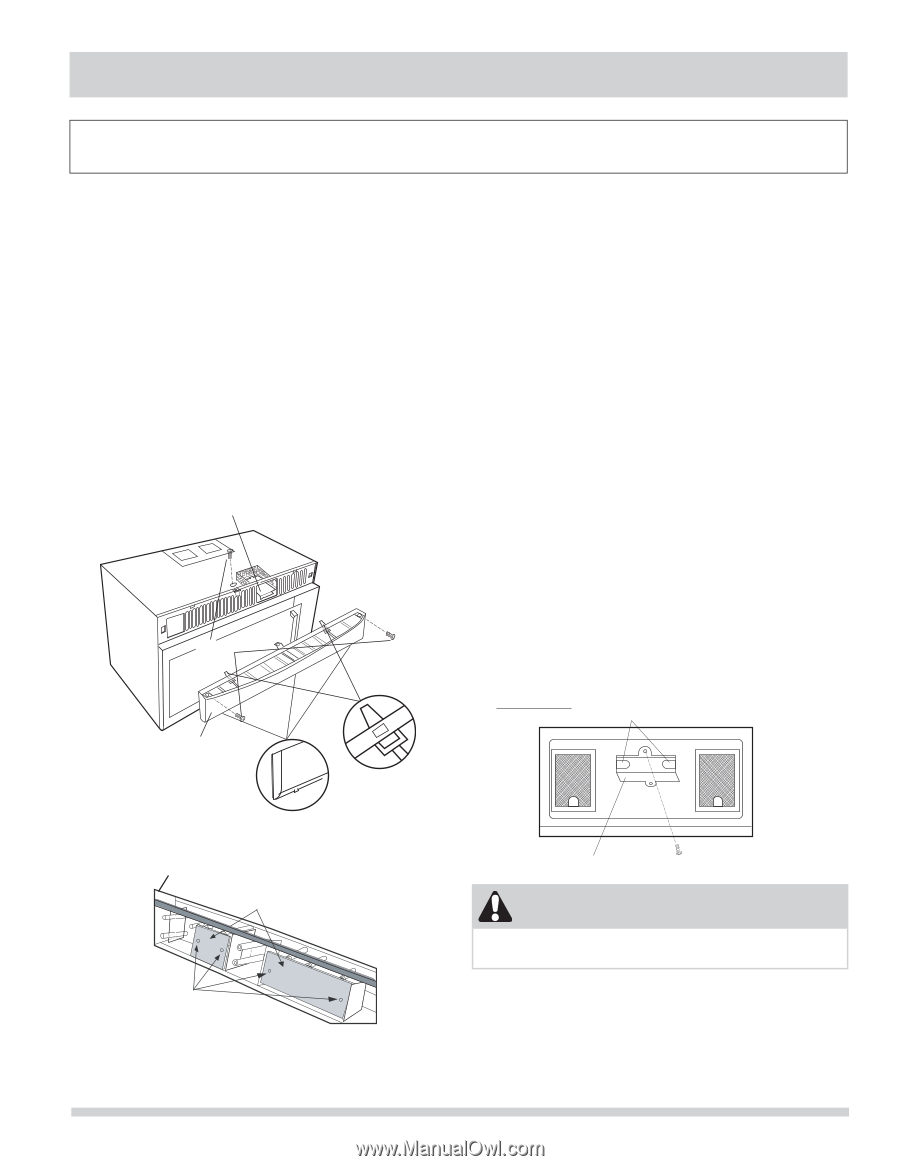
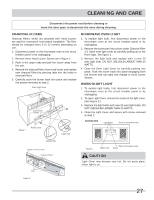
CLEANING AND CARE Disconnect the power cord before cleaning or leave the door open to deactivate the oven during cleaning. CHARCOAL FILTERS Charcoal Filters, which are attached with Hood Louver, are used for nonvented, recirculated installation. The filter should be changed every 6 to 12 months depending on use. 1. Disconnect power to the microwave oven at the circuit breaker panel or by unplugging. 2. Remove three Hood Louver Screws as in Figure 1. 3. Push in the upper tabs and pull the louver away from the unit. 4. Remove the charcoal filters from hood louver and replace new charcoal filters by piercing tabs into the holes in charcoal filters. 5. Carefully push the louver back into place and replace the screws removed at step 2. Oven Light Cover Hood Louver Screws Figure 1 Hood Louver Upper Tab MICROWAVE OVEN LIGHT 1. To replace light bulb, first disconnect power to the microwave oven at the circuit breaker panel or by unplugging. 2. Remove the louver per instructions under Charcoal Filter 2-3. Open oven light cover by carefully pulling up on the front edge. See figure 1. 3. Remove the light bulb and replace with a new 20 watt light bulb. DO NOT USE BULB LARGER THAN 20 WATTS. 4. Close the Oven Light Cover by carefully pushing into place. Push the louver back into place (engaging both the bottom and top tabs) and change to hood Louver Screws. WORK/NIGHT LIGHT 1. To replace light bulbs, first disconnect power to the microwave oven at the circuit breaker panel or by unplugging. 2. To open Light Cover, remove the screw on the light cover. (See Figure 3.) 3. Replace the light bulbs with new 20 watt light bulbs. DO NOT USE BULBS LARGER THAN 20 WATTS. 4. Close the Light Cover and secure with screw removed at step 2. BOTTOM VIEW Light Bulbs (Front of microwave oven) Bottom Tab Inside of Hood Louver Charcoal Filters Tabs Figure 3 (Rear of microwave oven) Light Cover Screw CAUTION Light Cover may become very hot. Do not press glass when light is on. Figure 2 27
-
 1
1 -
2
-
3
-
4
-
5
-
6
-
7
-
8
-
9
-
10
-
11
-
12
-
13
-
14
-
15
-
16
-
17
-
18
-
19
-
20
-
21
-
 22
22 -
 23
23 -
 24
24 -
 25
25 -
 26
26 -
 27
27 -
 28
28 -
 29
29
 |
 |