Frigidaire FGGS3045KF Installation Instructions (All Languages) - Page 5
Electrical connection, Cabinet Construction - gas range
 |
UPC - 057112102955
View all Frigidaire FGGS3045KF manuals
Add to My Manuals
Save this manual to your list of manuals |
Page 5 highlights
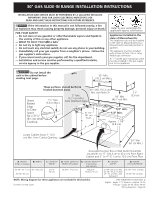
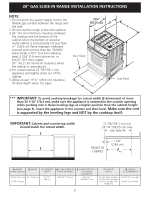
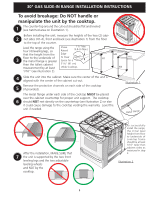
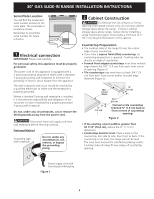
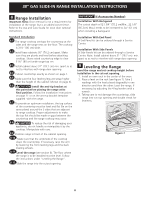
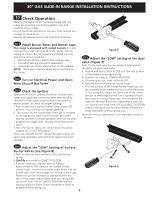
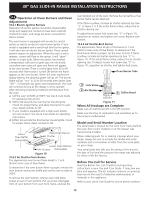
30" GAS SLIDE-IN RANGE INSTALLATION INSTRUCTIONS Serial Plate Location You will find the model and serial number printed on the serial plate. The serial plate is located as shown. Remember to record the serial number for future reference. 1 Electrical connection IMPORTANT Please read carefully. For personal safety, this appliance must be properly grounded. The power cord of this appliance is equipped with a 3-prong (grounding) plug which mates with a standard 3-prong grounding wall receptacle to minimize the possibility of electric shock hazard from the appliance. The wall receptacle and circuit should be checked by a qualified electrician to make sure the receptacle is properly grounded. Where a standard 2-prong wall receptacle is installed, it is the personal responsibility and obligation of the consumer to have it replaced by a properly grounded 3-prong wall receptacle. Do not, under any circumstances, cut or remove the third (ground) prong from the power cord. Disconnect electrical supply cord from wall receptacle before servicing cooktop. Preferred Method Grounding type wall receptacle Do not, under any circumstances, cut, remove, or bypass the grounding prong. 2 Cabinet Construction To eliminate the risk of burns or fire by reaching over heated surface units, do not have cabinet storage space above the range. If there is cabinet storage space above range, reduce risk by installing a range hood that projects horizontally a minimum of 5" (12.7 cm) beyond the bottom of the cabinet. Countertop Preparation • The cooktop sides of the range fit over the cutout edge of your countertop. • If you have a square finish (flat) countertop, no countertop preparation is required. Cooktop sides lay directly on edge of countertop. • Formed front-edged countertops must have molded edge shaved flat 3/4" (1.9 cm) from each front corner of opening (Figure 2). • Tile countertops may need trim cut back 3/4"(1.9 cm) from each front corner and/or rounded edge flattened (Figure 2). Min. Cutout Width ¾" (1.9 cm) ¾" (1.9 cm) 31½" (81 cm) Formed or tile countertop trimmed ¾" (1.9 cm) back at front corners of countertop opening. Figure 2 • If the existing cutout width is greater than 30 1/16" (76,4 cm), reduce the ¾" (1.9 cm) dimension. • Countertop must be level. Place a level on the countertop, first side to side, then front to back. If the countertop is not level, the range will not be level. The oven must be level for satisfactory baking results. Cooktop sides of range fit over edges of countertop opening. Power supply cord with 3-prong grounding plug. Figure 1 5
-
 1
1 -
 2
2 -
 3
3 -
 4
4 -
 5
5 -
 6
6 -
 7
7 -
 8
8 -
 9
9 -
 10
10 -
 11
11 -
12
-
13
-
14
-
15
-
16
-
17
-
18
-
19
-
20
-
21
-
22
-
23
-
24
-
25
-
26
-
27
-
28
-
29
-
30
-
31
-
32
-
33
-
34
-
35
-
36
 |
 |
