Frigidaire GHWW083WB1 Installation Instructions - Page 3
Storm Window, FIG. 5, FIG. 6B, FIG. 6A, FIG. 8A, FIG. 8B, FIG. 7A, FIG. 7B
 |
View all Frigidaire GHWW083WB1 manuals
Add to My Manuals
Save this manual to your list of manuals |
Page 3 highlights
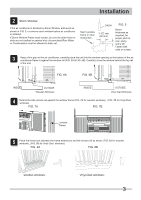
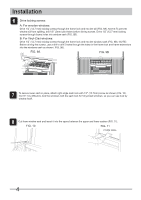
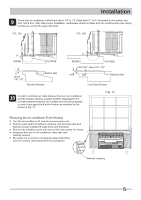
Installation Storm Window: If the air conditoner is blocked by Storm Window, add wood as shown in FIG. 5, or remove storm window before air conditioner is installed. If Storm Window Frame must remain, be sure the drain holes or slots are not caulked or painted shut. Accumulated Rain Water or Condensation must be allowed to drain out. Storm window frame or other obstruction. SASH 1-1/2" min (38 mm) FIG. 5 Board thickness as required, for proper pitch to rear, along entire sill. Fasten with nails or screws. Keep a firm grip on the air conditioner, carefully place the unit into the window opening so the bottom of the air conditioner frame is against the window sill (FIG. 6A & FIG. 6B). Carefully close the window behind the top rail of the unit. FIG. 6A FIG. 6B INSIDE OUTSIDE Wooden Windows INSIDE OUTSIDE Vinyl-Clad Windows Extend the side panels out against the window frame (FIG. 7A for wooden windows), (FIG. 7B for Vinyl-Clad windows). FIG. 7A FIG. 7B window frame Place the frame lock between the frame extensions and the window sill as shown (FIG. 8A for wooden windows), (FIG. 8B for Vinyl-Clad windows). FIG. 8A FIG. 8B wooden windows: Vinyl-Clad windows: 3
-
 1
1 -
 2
2 -
 3
3 -
 4
4 -
 5
5
 |
 |
