Frigidaire GHWW083WB1 Installation Instructions - Page 4
A: For wooden windows, B: For Vinyl-Clad windows, FIG. 9B, Drive locking screws
 |
View all Frigidaire GHWW083WB1 manuals
Add to My Manuals
Save this manual to your list of manuals |
Page 4 highlights
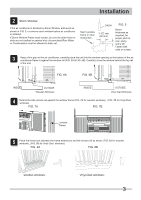
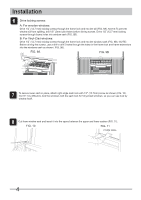
Installation Drive locking screws: A: For wooden windows: Drive 1/2 (12.7 mm) locking screws through the frame lock and into the sill (FIG. 9A). NOTE:To prevent window sill from splitting, drill 1/8 (3mm) pilot holes before driving screws. Drive 1/2 (12.7 mm) locking screws through frame holes into window sash (FIG. 9B). B: For Vinyl-Clad windows: Drive 1/2 (12.7 mm) locking screws through the frame lock and into the window sash (FIG. 9B). NOTE: Before driving the screws, use a drill to drill 5 holes through the holes in the frame lock and frame extensions into the windows sash as shown ( FIG. 9B). FIG. 9A FIG. 9B (FIG. 10). NOTE: It is difficult to lock the windows with the sash lock for Vinyl-Clad windows, so you can use lock by window itself. Cut foam window seal and insert it into the space between the upper and lower sashes (FIG. 11). FIG. 10 FIG. 11 FOAM SEAL 4
-
 1
1 -
 2
2 -
 3
3 -
 4
4 -
 5
5
 |
 |
