Frigidaire PLGF659GC Complete Owner's Guide (English)
Frigidaire PLGF659GC - 36 Inch Pro Style Gas Range Manual
 |
UPC - 057112098968
View all Frigidaire PLGF659GC manuals
Add to My Manuals
Save this manual to your list of manuals |
Frigidaire PLGF659GC manual content summary:
- Frigidaire PLGF659GC | Complete Owner's Guide (English) - Page 1
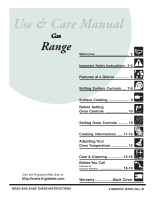
Gas Range Welcome 2 Important Safety Instructions . 3-5 Features at a Glance 6 Setting Surface Controls ..... 7-8 Surface Cooking 9 Before Setting Oven Controls 10 Setting Oven Controls .......... 10 Cooking Informations ...... 11-12 Adjusting Your Oven Temperature - Frigidaire PLGF659GC | Complete Owner's Guide (English) - Page 2
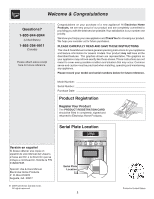
. We hope you consider us for future purchases. PLEASE CAREFULLY READ AND SAVE THESE INSTRUCTIONS This Use & Care Manual contains general operating instructions for your appliance and feature information for several models. Your product may not have all the described features. The graphics shown are - Frigidaire PLGF659GC | Complete Owner's Guide (English) - Page 3
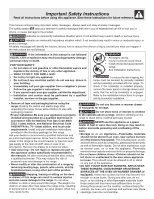
to the range at the circuit breaker or fuse box and gas supply at the main shutoff valve in case of an emergency. Remove the drawer to access the valve. • User servicing-Do not repair or replace any part of the appliance unless specifically recommended in the manuals. All other servicing should be - Frigidaire PLGF659GC | Complete Owner's Guide (English) - Page 4
a cause combustion problems. portion of the burner flame to direct contact and may result in ignition of clothing. Proper relationship of utensil to flame will also improve efficiency. Do not use stove top grills on the burner grates of sealed gas burners. If you use a stove top grill on a sealed - Frigidaire PLGF659GC | Complete Owner's Guide (English) - Page 5
or death. Conversion to Liquefied Petroleum Gas (or L. P. Gas) This natural gas range is designed to allow for conversion to installation instructions which must be read before and followed Liquefied Petroleum (L. P.) Gas. carefully when installing the kit. Only a qualified service agent should - Frigidaire PLGF659GC | Complete Owner's Guide (English) - Page 6
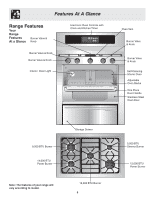
Burner Valve & Knob Self-Cleaning Interior Oven Adjustable Oven Racks One Piece Door Handle Stainless Steel Oven Door 9,500 BTU Burner 14,000 BTU Power Burner Note: The features of your range will vary according to model. Storage Drawer 16,000 BTU Burner 6 5,000 BTU Simmer Burner 12,000 BTU Power - Frigidaire PLGF659GC | Complete Owner's Guide (English) - Page 7
in place whenever the surface burners are in use. Electrodes must align into slot or hole for each Burner Head Figure 1 Figure 2 Locations of the Gas Surface Burners The SIMMER burner is best used for simmering delicate sauces, etc. This burner is located at the right rear burner position on the - Frigidaire PLGF659GC | Complete Owner's Guide (English) - Page 8
top of the range when it is in use. These items could melt or ignite. lighting surface burners manually. Operating the Gas Surface Controls: Use the recommendations below as a guide for determining proper flame size for energy and increases your risk of being burned by the flame (Figure 2). For deep - Frigidaire PLGF659GC | Complete Owner's Guide (English) - Page 9
Note: Always use a utensil for its intended Figure 2 purpose. Follow manufacturer's instructions. Some utensils were not made to be used in the oven or on the in most cookshop or hardware stores. Roundbottomed woks (with a support ring that does not extend beyond the burner circumference) may also - Frigidaire PLGF659GC | Complete Owner's Guide (English) - Page 10
" by itself to keep the electronics cool. It may continue to run after the range has been turned "OFF", but may also stop immediately and then turn "ON" up front of rack and slide out. To replace, fit the rack onto the guides on the oven walls. Tilt the front of the rack upward and slide the rack - Frigidaire PLGF659GC | Complete Owner's Guide (English) - Page 11
Baking Problems and Solutions Chart Baking Problems Causes Corrections Cookies and biscuits burn on the bottom. Cakes too dark on top or the oven rack. If the water level is uneven, refer to the installation instructions for leveling the range. • Be sure to allow 5.1 cm to 10.2 cm (2" to 4") - Frigidaire PLGF659GC | Complete Owner's Guide (English) - Page 12
(Some models only) Figure 1 Note: Broiler pan and the insert allows grease to drain and be kept away from the high heat of the broiler. DO NOT use the pan without the insert. DO NOT cover the insert with foil; the exposed grease could ignite. Adjusting Your Oven Temperature For instructions on how - Frigidaire PLGF659GC | Complete Owner's Guide (English) - Page 13
models) Adhere to the following cleaning precautions: - Allow the oven to cool before cleaning. - Wear rubber gloves when cleaning any exterior parts of the oven manually range. Move birds to another well ventilated room. Before cleaning any part cycle to burn soil on. on the top of the Guide. 13 - Frigidaire PLGF659GC | Complete Owner's Guide (English) - Page 14
cleanings later. Surfaces How to Clean Aluminum & Vinyl Control Panel and Trim Pieces Glass, Painted and Plastic Body Parts, Control Knobs and Decorative Trim Pieces Stainless Steel (some models) Oven door & drawer front panel Oven Racks Use hot, soapy water and a cloth. Dry with a clean cloth - Frigidaire PLGF659GC | Complete Owner's Guide (English) - Page 15
gas Burners are sealed, cleanups are easy when spillovers are cleaned up immediately. The cooktop, Burner Heads and Caps should be routinely cleaned. Keeping the Burner Head Ports clean will prevent improper ignition and an uneven flame. Refer to the following instructions any parts from all models)- - Frigidaire PLGF659GC | Complete Owner's Guide (English) - Page 16
burn Stainless Steel models only) Some models are equipped with stainless steel exterior parts. Special care and cleaning are required for maintaining the appearance of stainless parts. Please refer to the table provided at the beginning of the General Care & Cleaning section in this Use & Care Guide - Frigidaire PLGF659GC | Complete Owner's Guide (English) - Page 17
2. Hold the door at the sides near the top. 3. Slide the door down onto the hinges as can be removed to facilitate cleaning under the range. Use care when handling the drawer. To open into the opening. 2. Fit the end rollers onto the guide rails. 3. Hold the drawer in a horizontal position, then - Frigidaire PLGF659GC | Complete Owner's Guide (English) - Page 18
accessible for service. (1) Cabinets not square or are built in too tight. Contact a cabinet maker to correct the problem. (2) Contact builder or installer to make appliance accessible. (3) Carpeting interferes with range. Provide sufficient space so range can be lifted over carpet. (4) Gas line is - Frigidaire PLGF659GC | Complete Owner's Guide (English) - Page 19
oven. If fault recurs, record fault number. Press STOP/CLEAR and call an authorized servicer. Oven light does not work. (1) Replace bulb. See "Changing Oven Light" in this Use and Care Guide for instructions. Poor baking results. (1) Many factors affect baking results. Make sure the proper rack - Frigidaire PLGF659GC | Complete Owner's Guide (English) - Page 20
provided with the product. 2. Proper installation by an authorized servicer in accordance with instructions provided with the appliance and in accordance with all local plumbing, electrical and/or gas codes. 3. Proper connection to a grounded power supply of sufficient voltage, replacement
-
 1
1 -
 2
2 -
 3
3 -
 4
4 -
 5
5 -
 6
6 -
 7
7 -
8
-
9
-
10
-
11
-
12
-
13
-
14
-
15
-
16
-
17
-
18
-
19
-
20
 |
 |

318200763 (0703) Rev. B
Gas
Gas
Gas
Gas
Gas
Range
Warranty
..................
Back Cover
Before You Call
...........................................
18-19
Adjusting Your
Oven Temperature
.................
12
Solutions to
Common Problems
Care & Cleaning
...............
13-18
Cooking Informations
......
11-12
Setting Oven Controls
..........
10
Before Setting
Oven Controls
.......................
10
Features at a Glance
...............
6
Important Safety Instructions .
3-5
Welcome
...................................
2
Setting Surface Controls
.....
7-8
Surface Cooking
......................
9