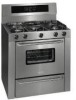
Frigidaire PLGF659GC Wiring Diagram (All Languages) - Page 2
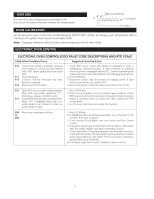
Electronic Oven Control Eoc Fault Code Descriptions And Rtd Scale
 |
UPC - 057112098968
View all Frigidaire PLGF659GC manuals
Add to My Manuals
Save this manual to your list of manuals |
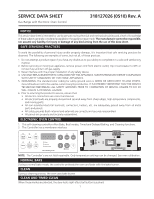
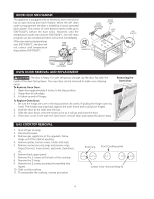
Page 2 highlights
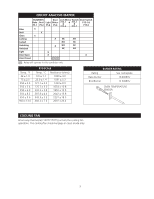
FIRST RISE It is normal to see a temperature overshoot in the first rise of all modes when you monitor the temperature. OVEN CALIBRATION First rise overshoot T° set point t (sec) Set the electronic oven control for normal baking at 350°F/176°C. Obtain an average oven temperature after a minimum of 5 cycles. Press Cancel to end bake mode. Note: Changing calibration affects all the cooking modes but not the clean mode. ELECTRONIC OVEN CONTROL ELECTRONIC OVEN CONTROL (EOC) FAULT CODE DESCRIPTIONS AND RTD SCALE Likely Failure Condition/Cause Suggested Corrective Action F10 Control has sensed a potential runaway oven condition. Control may have shorted relay, RTD sensor probe may have gone bad. F11 Shorted keypad. F13 Control's internal checksum may have become corrupted. F14 Misconnected flat cables. 1. Check RTD sensor probe and replace if necessary. If oven is overheating, disconnect power. If oven continues to overheat when the power is reapplied, replace EOC. Severe overheating may require the entire oven to be replaced, should damage be extensive. 2. Press CLEAR key. 3. Disconnect power, wait 30 seconds and reapply power. If fault returns upon power-up, replace EOC. 4. Disconnect power; verify flat cable connections (P12 or P13). F30 Open RTD sensor probe/ wiring problem. Note: EOC may initially display an "F1", thinking a runaway condition exists. F31 Shorted RTD sensor probe / wiring problem. Note: "F3" is displayed when oven is in active mode or an attempt to enter an active mode is made. 1. Press CLEAR key. 2. Check wiring in probe circuit for possible open condition. Check RTD resistance at room temperature (compare to probe resistance chart). If resistance does not match the chart, replace the RTD sensor probe. 3. Let the oven cool down and restart the function F90 Door motor mechanism failure. to F94 1. Press CLEAR key. 2. If CLEAR key does not eliminate problem, turn off power for 30 seconds, then turn on power. 3. Check wiring of Lock Motor, and Lock Switch and Door Switch circuits. 4. Unplug P5, apply power (L1) directly to the Lock Motor, if the motor does not rotate, replace Lock Motor Assembly. Plug P5. 5. Check Lock Switch A for proper operation (do they open and close, check with ohmmeter). The Lock Motor may be powered as in above step to open and close Lock Switch. If the Lock Switch is defective, replace Motor Lock Assembly. 6. If all above steps fail to correct situation, replace control. 2
-
 1
1 -
 2
2 -
 3
3 -
 4
4
 |
 |
