Frigidaire PLGF659GC Wiring Diagram (All Languages) - Page 4
Gas Cooktop Removal, Oven Door Removal And Replacement, Door Lock Mechanism - gas range
 |
UPC - 057112098968
View all Frigidaire PLGF659GC manuals
Add to My Manuals
Save this manual to your list of manuals |
Page 4 highlights
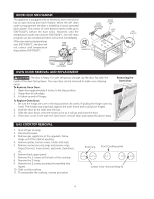
DOOR LOCK MECHANISM The appliance is equipped with an electronic oven control and has an auto locking door latch feature. When the self clean cycle is programmed, the door is locked by a motor operated latch system. The interior of oven does'nt need to heat up to 500°F/260°C before the door locks. However, until the temperature inside oven reaches 500°F/260°C, the self-clean program can be canceled and door will unlock immediately. After oven reaches temperatures over 500°F/260°C, the door will not unlock until temperature drops below 500°F/260°C. DOOR LATCH MOTOR LIMIT SWITCH SAFETY THERMOSTAT DOOR LOCKING MECHANISM ASSEMBLY MOTOR COOLING FAN LATCH ROD ROD SPRING ROD BUSHING DOOR LATCH CAM ASSEMBLY OVEN DOOR REMOVAL AND REPLACEMENT The door is heavy. For safe, temporary storage, lay the door flat with the inside of the door facing down. The oven door can be removed to make oven cleaning easier. To Remove Oven Door: 1. Open door approximately 4 inches to the stop position. 2. Grasp door at side edges. 3. Lift door up and off hinges. To Replace Oven Door: 1. Be sure the hinge arms are in the stop position. Be careful if pulling the hinges open by hand. The hinges may snap back against the oven frame and could pinch fingers. 2. Hold the door at the sides near the top. 3. Slide the door down onto the hinges as far as it will go and close the door. 4. If the door is not in line with the oven frame, remove door and repeat the above steps. Removing the Oven Door GAS COOKTOP REMOVAL 1. Shut off gas to range. 2. Disconnect power. 3. Remove gas supply line at the regulator. Move range out of the cabinet opening. 4. Remove grates, burner covers, knobs and seals. 5. Remove screws securing rings and remove rings. Inspect burners, loose screws, electrode, cleanliness, etc. 6. Remove back upper panel. 7. Remove the 2 screws at the back of the cooktop. 8. Remove the 5 knobs. 9. Remove the 2 screws securing the manifold (see figure). 10. Slide out the cooktop. 11. To reassemble the cooktop, reverse procedure. Knob ring Front Cooktop panel screws to be removed (step 9) 4
-
 1
1 -
 2
2 -
 3
3 -
 4
4
 |
 |
