Fujitsu ST4120 User Guide - Page 63
Sharing, Setting [File and Printer Sharing for Microsoft, Networks], Sharing Files, Printer Sharing
 |
View all Fujitsu ST4120 manuals
Add to My Manuals
Save this manual to your list of manuals |
Page 63 highlights
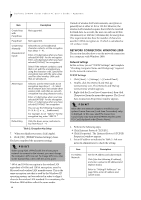
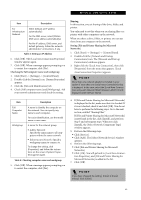
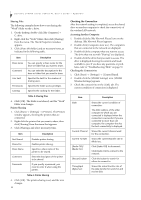
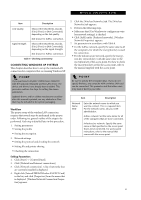
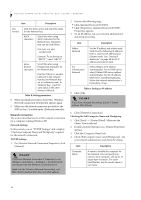
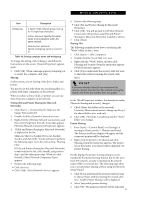
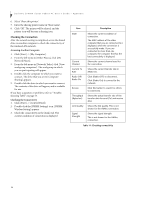
Wireless LAN User's Guide Item Description Workgroup A name of the network group. Use up to 15 single-byte characters. AdHoc Network: Specify the same name to all computers within the same network. Infrastructure Network: Specify workgroup name to connect to. Table 10: Setting computer name and workgroup To change the setting, click [Change], and follow the instructions on the screen. [System Properties] appears again. 5. Click [OK]. When a message appears prompting you to restart the computer, click [Yes]. Sharing In this section, you set sharing of the drive, folder, and printer. You need to set this only when you are sharing files or a printer with other computers on the network. When you share a drive, folder, or printer, you can use these from any computer on the network. Setting [File and Printer Sharing for Microsoft Networks] 1. Click [Start] -> [Control Panel]. Make sure the Classic View is selected. 2. Double-click the [Network Connection] icon. 3. Right click the [Wireless Network Connection], and then click [Properties] from the menu that appears. [Wireless Network Connection Properties] appears. 4. If [File and Printer Sharing for Microsoft Networks] is displayed in the list: Make sure that it is checked. If it is not checked, check it, and click [OK]. You do not have to perform the following steps. Go to the next section, "Sharing Files." If [File and Printer Sharing for Microsoft Networks] is not found in the list, click [Install], and perform Step 5 and the subsequent steps. When you click [Install], [Select Network Component Type] appears. 5. Perform the following steps. ■ Click [Service]. ■ Click [Add]. [Select Network Service] appears. 6. Perform the following steps. ■ Click [File and Printer Sharing for Microsoft Networks]. ■ Click [OK]. You will go back to [Wireless Network Connection 2 Properties], and [File and Printer Sharing for Microsoft Networks] is added to the list. 7. Click [Close]. Sharing Files The following example shows how to set sharing the "Work" folder on the c: drive. 1. Click [Start] -> [My Computer]. 2. Double-click the [Local Disk (c:)] icon. 3. Right click the "Work" folder, and then click [Sharing and Security] from the menu that appears. [Work Properties] appears. 4. Click [If you understand the security risks but want to share files without running the wizard, click here]. POINT If you have already clicked [If you understand the security risks but want to share files without running the wizard, click here], this window does not appear. In the [Work Properties] window, the description under [Network Sharing and security] changes. 5. Check [Share this folder on the network]. Uncheck [Allow network users to change my files], if the shared folder is for read only. 6. Click [OK]. The folder is set shared, and the "Work" folder icon changes. Printer Sharing 1. Press [Start]->[Control Panel] (or [Settings], if viewing in Classic mode)-> [Printers and Faxes]. The Printers and Faxes display will appear and the connected printers will be displayed. 2. Right-click the printer to be shared, and click [Sharing] from the menu that appears. The properties of the printer to be shared will be displayed. Set printer sharing. On the display, the printer sharing setting is recommended by the Network Setup Wizard, but for the wireless LAN network, security is maintained by network name (SSID) or network key. The following steps allow you to set up printer sharing without using the Network Setup Wizard. 3. Click 'If you understand the security risks but want to share printers without running the wizard, click here. 'Enable Printer Sharing' will be displayed. 4. Select 'Just enable printer sharing'. 5. Click 'OK'. The printer properties will be indicated. 53
-
 1
1 -
2
-
3
-
4
-
5
-
6
-
7
-
8
-
9
-
10
-
11
-
12
-
13
-
14
-
15
-
16
-
17
-
18
-
19
-
20
-
21
-
22
-
23
-
24
-
25
-
26
-
27
-
28
-
29
-
30
-
31
-
32
-
33
-
34
-
35
-
36
-
37
-
38
-
39
-
40
-
41
-
42
-
43
-
44
-
45
-
46
-
47
-
48
-
49
-
50
-
51
-
52
-
53
-
54
-
55
-
56
-
57
-
 58
58 -
 59
59 -
 60
60 -
 61
61 -
 62
62 -
 63
63 -
 64
64 -
 65
65 -
 66
66 -
 67
67 -
 68
68 -
69
-
70
-
71
-
72
-
73
-
74
 |
 |
