Ganz Security DR-16M85-RA 1 Microsoft Edge Deployment Guide - Page 8
Cloud Site List Management experience
 |
View all Ganz Security DR-16M85-RA manuals
Add to My Manuals
Save this manual to your list of manuals |
Page 8 highlights
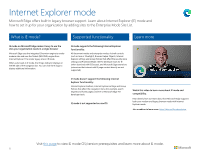
Cloud Site List Management experience Upload and manage your IE mode site list in a new compliant cloud location through the Microsoft 365 admin center. This is available as a public preview. Prerequisites Steps Watch the video To access the Cloud Site List Management experience for IE mode in the Microsoft 365 admin center, you will need to: • Have an Exchange subscription. • Be a Microsoft 365 global admin or Edge administrator (*New role*) For your users' devices to recognize a cloud site list hosted from the Microsoft 365 admin center, they will need to be signed into Microsoft Edge with their Azure AD profile. For detailed information, visit our Docs page. Step 1: From the homepage, go to Settings then Org Settings. From the list, open "Microsoft Edge site lists". Step 2: Select "Create a new list". Step 3: Add individual sites using the dashboard to create a site list or upload an xml or EMIE file to import an existing site list. Step 4: Once you're ready, go back to the Microsoft Edge site lists dashboard and select "Publish site list". Step 5: Now that you've published your site list, copy the site list ID and open the Windows registry. Under Policies > Microsoft Edge, find the InternetExplorerintegrationCloudSiteList policy and open it. Paste the site list ID in the value data field and save. Remember: • When you edit the list, such as adding or removing sites, you'll need to publish the site list again. • You can publish multiple site lists and assign different groups of users to each list, but each user can only recognize one published site list at a time. Watch a quick video on how to use the new Cloud Site List Management experience for IE mode. Learn about perquisites, get helpful reminders, and see a step-bystep walkthrough of how to set up and publish your IE mode site list using the new Cloud Site List Management experience in the Microsoft 365 admin center. Visit this page to view IE mode OS/version prerequisites and learn more about IE mode. 8
-
 1
1 -
2
-
 3
3 -
 4
4 -
 5
5 -
 6
6 -
 7
7 -
 8
8 -
 9
9 -
 10
10 -
 11
11 -
 12
12 -
 13
13 -
14
 |
 |
