Ganz Security ZCOH5-D25NXA ZC-OH5 Manual - Page 3
Built-in Conduit Hole
 |
View all Ganz Security ZCOH5-D25NXA manuals
Add to My Manuals
Save this manual to your list of manuals |
Page 3 highlights
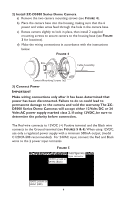
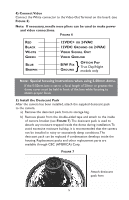
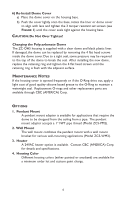
FIGURE 1 DOME REMOVAL Rubber mounting washers (x4) Cable Assembly Plastic anchors (x4) for drywall only. Mounting Screws (x4) Loosen (x3) Set Screws to remove trim ring and bubble. b) Using a minimum 1/2" drill bit, drill the cable feed hole and feed the video/power cable through the mounting surface or attach 3/4" conduit fitting to the hole in the side and seal with pipe thread tape (see FIGURE 2). FIGURE 2 BACK VIEW CONDUIT HOLE FIGURE 3 INSIDE BASE MOUNTING HOLES Built-in Conduit Hole Mounting holes for camera base (2) Mounting holes for housing, covered by rubber plugs (4) c) Holding the dome against the mounting surface, mark and drill the 4 mounting holes (see FIGURE 3). Fasten the base to the mounting surface using the supplied #8 Phillips screws, rubber washers and plastic anchors (anchors for dry wall only), (see FIGURE 1). Depending on the mounting surface other hardware may be needed. Add rubber gasket seal to the back of the housing for sealing on a flat surfaces. For uneven surfaces a bead of silicone sealant is recommended. Note: If using other mounting hardware; apply silicone sealant around the inside of the 4 mounting holes before inserting screws or bolts to prevent damage from leakage. 3
-
 1
1 -
 2
2 -
 3
3 -
 4
4 -
 5
5 -
 6
6 -
 7
7 -
 8
8
 |
 |
