Garmin Dash Cam 67W Owners Manual - Page 8
Connecting the Device to Vehicle Power, Setting the Camera Placement, Settings, Driver Assistance
 |
View all Garmin Dash Cam 67W manuals
Add to My Manuals
Save this manual to your list of manuals |
Page 8 highlights
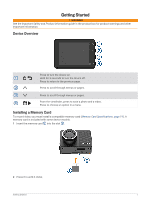
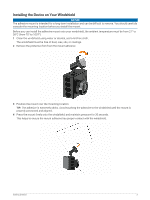
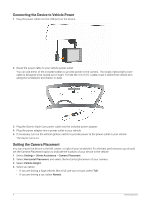
Connecting the Device to Vehicle Power 1 Plug the power cable into the USB port on the device. 2 Route the power cable to your vehicle power outlet. You can use either of the included cables to provide power to the camera. The longer, lightweight power cable is designed to be routed out of sight. To hide the 4 m (13 ft.) cable, route it behind the vehicle trim along the windshield, doorframe, or dash. 3 Plug the Garmin Dash Cam power cable into the included power adapter. 4 Plug the power adapter into a power outlet in your vehicle. 5 If necessary, turn on the vehicle ignition switch to provide power to the power outlet in your vehicle. The device turns on. Setting the Camera Placement You can mount the device in the left, center, or right of your windshield. For the best performance, you should set the Camera Placement option to indicate the location of your device in the vehicle. 1 Select Settings > Driver Assistance > Camera Placement. 2 Select Horizontal Placement, and select the horizontal placement of your camera. 3 Select Vehicle Height. 4 Select an option: • If you are driving a large vehicle, like a full size van or truck, select Tall. • If you are driving a car, select Normal. 4 Getting Started
-
 1
1 -
2
-
 3
3 -
 4
4 -
 5
5 -
 6
6 -
 7
7 -
 8
8 -
 9
9 -
 10
10 -
 11
11 -
 12
12 -
 13
13 -
14
-
15
-
16
-
17
-
18
-
19
-
20
-
21
-
22
-
23
-
24
-
25
-
26
-
27
-
28
-
29
-
30
 |
 |
