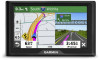
Garmin Drive 52 and Traffic Owners Manual - Page 14
Viewing Upcoming Traffic, Customizing the Map, Receiving Traffic Data Using a Traffic, Receiver
 |
View all Garmin Drive 52 and Traffic manuals
Add to My Manuals
Save this manual to your list of manuals |
Page 14 highlights
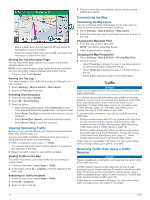
• Select a data field in the trip data tool , and select the information to show in the field. • Select the customizable map data field , and select the information to show in the field. Viewing the Trip Information Page The trip information page displays your speed and provides statistics about your trip. NOTE: If you make frequent stops, leave the device turned on, so it can accurately measure elapsed time during the trip. From the map, select Speed. Viewing the Trip Log Your device keeps a trip log, which is a record of the path you have traveled. 1 Select Settings > Map & Vehicle > Map Layers. 2 Select the Trip Log check box. Resetting Trip Information 1 From the map, select Speed. 2 Select > Reset Field(s). 3 Select an option: • When not navigating a route, select Select All to reset every data field except the speedometer, on the first page. • Select Reset Trip Data to reset the information on the trip computer. • Select Reset Max. Speed to reset the maximum speed. • Select Reset Trip B to reset the odometer. Viewing Upcoming Traffic Before you can use this feature, your device must be receiving traffic data (Traffic, page 10). You can view traffic incidents coming up along your route or along the road on which you are traveling. 1 While navigating a route, select > Traffic. The nearest upcoming traffic incident appears in a panel on the right side of the map. 2 Select the traffic incident to view additional details. Viewing Traffic on the Map The traffic map shows color-coded traffic flow and delays on nearby roads. 1 From the main menu, select Apps > Traffic. 2 If necessary, select > Legend to view the legend for the traffic map. Searching for Traffic Incidents 1 From the main menu, select Apps > Traffic. 2 Select > Incidents. 3 Select an item in the list. 4 If there is more than one incident, use the arrows to view additional incidents. Customizing the Map Customizing the Map Layers You can customize which data appear on the map, such as icons for points of interest and road conditions. 1 Select Settings > Map & Vehicle > Map Layers. 2 Select the check box next to each layer you want to show on the map. Changing the Map Data Field 1 From the map, select a data field. NOTE: You cannot customize Speed. 2 Select a type of data to display. Changing the Map Perspective 1 Select Settings > Map & Vehicle > Driving Map View. 2 Select an option: • Select Track Up to display the map in two dimensions (2D), with your direction of travel at the top. • Select North Up to display the map in 2-D with north at the top. • Select 3-D to display the map in three dimensions. Traffic NOTICE Garmin is not responsible for the accuracy or timeliness of the traffic information. Your device can provide information about traffic on the road ahead or on your route. You can set your device to avoid traffic when calculating routes, and to find a new route to your destination if a large traffic delay occurs on your active route (Traffic Settings, page 13). The traffic map allows you to browse the map for traffic delays in your area. To provide traffic information, your device must be receiving traffic data. • Product models ending with MT can receive traffic data from an over-the-air broadcast signal using the built-in traffic receiver and the included vehicle power cable (Receiving Traffic Data Using a Traffic Receiver, page 10). • Product models ending with MT-S can receive subscriptionfree traffic data using the Smartphone Link app (Receiving Traffic Data Using Smartphone Link, page 11). These models cannot receive an over-the-air traffic signal. Traffic data is not available in all areas. For information about traffic coverage areas, go to garmin.com/traffic. Receiving Traffic Data Using a Traffic Receiver NOTICE Heated (metallized) windshields could degrade the performance of the traffic receiver. A traffic receiver receives traffic data from an over-the-air broadcast signal, where available. To receive over-the-air traffic data, the device must be connected to vehicle power using a traffic-compatible power cable. A traffic receiver is included with some product models (Traffic, page 10). . Traffic data is not available in all areas. For information about traffic coverage areas, go to garmin.com/traffic. 10 Traffic
-
 1
1 -
2
-
3
-
4
-
5
-
6
-
7
-
8
-
 9
9 -
 10
10 -
 11
11 -
 12
12 -
 13
13 -
 14
14 -
 15
15 -
 16
16 -
 17
17 -
 18
18 -
 19
19 -
20
-
21
-
22
-
23
-
24
 |
 |
