Garmin Drive Owners Manual - Page 10
Saving Locations, Routes, Starting a Route, Your Route on the Map
 |
View all Garmin Drive manuals
Add to My Manuals
Save this manual to your list of manuals |
Page 10 highlights
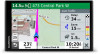
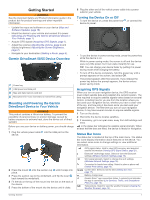
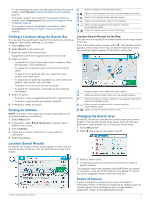
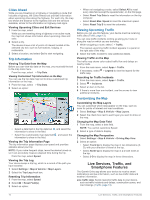
Removing a Shortcut 1 Select Where To? > > Remove Shortcut(s). 2 Select a shortcut to remove. 3 Select the shortcut again to confirm. 4 Select Done. Saving Locations Saving a Location 1 Search for a location (Finding a Location by Category, page 4). 2 From the search results, select a location. 3 Select > Save. 4 Enter a name, and select Done. Saving Your Current Location 1 From the map, select the vehicle icon. 2 Select Save. 3 Enter a name, and select Done. 4 Select OK. Editing a Saved Location 1 Select Where To? > Saved. 2 If necessary, select a category. 3 Select a location. 4 Select . 5 Select > Edit. 6 Select an option: • Select Name. • Select Phone Number. • Select Categories to assign categories to the saved location. • Select Change Map Symbol to change the symbol used to mark the saved location on a map. 7 Edit the information. 8 Select Done. Assigning Categories to a Saved Location You can add custom categories to organize your saved locations. NOTE: Categories appear in the saved locations menu after you have saved at least 12 locations. 1 Select Where To? > Saved. 2 Select a location. 3 Select . 4 Select > Edit > Categories. 5 Enter one or more category names, separated by commas. 6 If necessary, select a suggested category. 7 Select Done. Deleting a Saved Location NOTE: Deleted locations cannot be recovered. 1 Select Where To? > Saved. 2 Select > Delete Saved Places. 3 Select the box next to the saved locations to delete, and select Delete. Navigating to Your Destination Routes A route is a path from your current location to one or more destinations. • The device calculates a recommended route to your destination based on the preferences you set, including the route calculation mode (Changing the Route Calculation Mode, page 8) and avoidances (Avoiding Delays, Tolls, and Areas, page 8). • You can start navigating to your destination quickly using the recommended route, or you can select an alternate route (Starting a Route, page 6). • If there are specific roads you need to use or avoid, you can customize the route (Shaping Your Route, page 7). • You can add multiple destinations to a route (Adding a Location to Your Route, page 7). Starting a Route 1 Select Where To?, and search for a location (Finding and Saving Locations, page 2). 2 Select a location. 3 Select an option: • To start navigating using the recommended route, select Go!. • To choose an alternate route, select , and select a route. Alternate routes appear to the right of the map. • To edit the course of the route, select > Edit Route, and add shaping points to the route (Shaping Your Route, page 7). The device calculates a route to the location and guides you using voice prompts and information on the map (Your Route on the Map, page 6). A preview of the major roads in your route appears at the edge of the map for several seconds. If you need to stop at additional destinations, you can add the locations to your route (Adding a Location to Your Route, page 7). Starting a Route by Using the Map You can start route by selecting a location from the map. 1 Select View Map. 2 Drag and zoom the map to display the area to search. 3 If necessary, select to filter the displayed points of interest by category. Location markers ( or a blue dot) appear on the map. 4 Select an option: • Select a location marker. • Select a point, such as a street, intersection, or address location. 5 Select Go!. Going Home The first time you start a route home, the device prompts you to enter your home location. 1 Select Where To? > Go Home. 2 If necessary, enter your home location. Editing Your Home Location 1 Select Where To? > > Set Home Location. 2 Enter your home location. Your Route on the Map As you travel, the device guides you to your destination using voice prompts and information on the map. Instructions for your 6 Navigating to Your Destination
-
 1
1 -
2
-
3
-
4
-
 5
5 -
 6
6 -
 7
7 -
 8
8 -
 9
9 -
 10
10 -
 11
11 -
 12
12 -
 13
13 -
 14
14 -
 15
15 -
16
-
17
-
18
-
19
-
20
-
21
-
22
-
23
-
24
-
25
-
26
-
27
-
28
 |
 |
