Garmin Forerunner 25 Owners Manual - Page 8
Putting On the Optional Heart Rate Monitor, Pairing the Heart Rate Monitor, Setting Your Maximum - buy
 |
View all Garmin Forerunner 25 manuals
Add to My Manuals
Save this manual to your list of manuals |
Page 8 highlights
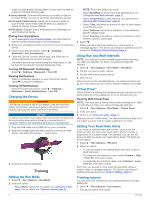
ANT+ Sensors Your device can be used with wireless ANT+ sensors. For more information about compatibility and purchasing optional sensors, go to http://buy.garmin.com. Putting On the Optional Heart Rate Monitor NOTICE The heart rate monitor may cause chafing when used for long periods of time. To alleviate this issue, apply an anti-friction lubricant or gel to the center of the module where it contacts your skin. Do not apply anti-friction gel or lubricant on the electrodes. Do not use gels or lubricants that contain sunscreen. You should wear the heart rate monitor directly on your skin, just below your sternum. It should be snug enough to stay in place during your activity. 1 Push one tab of the strap through the slot in the heart À Á rate monitor module. 2 Press the tab down. 3 Wet the electrodes on the back of the module to create a  strong connection between your chest and the heart rate monitor module. Setting Your Maximum Heart Rate The device uses your user profile information from the initial setup to estimate your maximum heart rate and determine your default heart rate zones. The default maximum heart rate is 220 minus your age. For the most accurate calorie data during your activity, you should set your maximum heart rate (if known). 1 Select > Settings > User Profile > Max. HR. 2 Enter your maximum heart rate. About Heart Rate Zones Many athletes use heart rate zones to measure and increase their cardiovascular strength and improve their level of fitness. A heart rate zone is a set range of heartbeats per minute. The five commonly accepted heart rate zones are numbered from 1 to 5 according to increasing intensity. Generally, heart rate zones are calculated based on percentages of your maximum heart rate. Fitness Goals Knowing your heart rate zones can help you measure and improve your fitness by understanding and applying these principles. • Your heart rate is a good measure of exercise intensity. • Training in certain heart rate zones can help you improve cardiovascular capacity and strength. • Knowing your heart rate zones can prevent you from overtraining and can decrease your risk of injury. If you know your maximum heart rate, you can use the table (Heart Rate Zone Calculations, page 7) to determine the best heart rate zone for your fitness objectives. If you do not know your maximum heart rate, use one of the calculators available on the Internet. Some gyms and health centers can provide a test that measures maximum heart rate. The default maximum heart rate is 220 minus your age. 4 Wrap the strap around your chest and attach it to the other side of the heart rate monitor module. The Garmin® logo should be right-side up. 5 Bring the device within 3 m (10 ft.) of the heart rate monitor. After you put on the heart rate monitor, it is active and sending data. Pairing the Heart Rate Monitor The first time you connect a heart rate monitor to your device, you must pair the device and sensor. After the initial pairing, the device automatically connects to the sensor when you go for a run and the sensor is active and within range. NOTE: If your device was packaged with a heart rate monitor, the device and sensor are already paired. 1 Put on the heart rate monitor (Putting On the Optional Heart Rate Monitor, page 4). 2 Select . 3 Bring the device within 1 cm of the center of the heart rate monitor, and wait while the device connects to the sensor. When the device detects the heart rate monitor, a message appears and appears solid. Foot Pod Your device is compatible with the foot pod. You can use the foot pod to record pace and distance instead of using GPS when you are training indoors or when your GPS signal is weak. The foot pod is on standby and ready to send data (like the heart rate monitor). After 30 minutes of inactivity, the foot pod powers off to conserve the battery. When the battery is low, a message appears on your device. Approximately five hours of battery life remain. Going for a Run Using a Foot Pod You can run indoors using a foot pod to record pace, distance, and cadence. You can also run outdoors using a foot pod to record cadence data with your GPS pace and distance. 1 Install your foot pod according to the accessory instructions. 2 Select . 3 If necessary, turn off GPS (Training Indoors, page 2). 4 Activate the foot pod by taking a few steps. 5 Bring the device close to the sensor, and wait while the device pairs to the sensor. When the device detects the foot pod, a message appears. After the initial pairing, the device automatically connects to the sensor when you go for a run and the sensor is active and within range. 6 Select Start to start the timer. 7 Go for a run. 8 After you complete your run, select to stop the timer. Foot Pod Calibration The foot pod is self-calibrating. The accuracy of the speed and distance data improves after a few outdoor runs using GPS. 4 ANT+ Sensors
-
 1
1 -
2
-
 3
3 -
 4
4 -
 5
5 -
 6
6 -
 7
7 -
 8
8 -
 9
9 -
 10
10 -
 11
11 -
 12
12 -
 13
13 -
14
 |
 |
