Garmin GPS 17HVS 2006/2010/GPS 17 Installation - Page 4
Surface Mount
 |
UPC - 753759052546
View all Garmin GPS 17HVS manuals
Add to My Manuals
Save this manual to your list of manuals |
Page 4 highlights
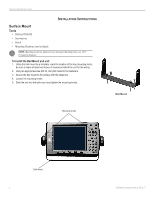
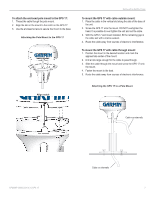
INSTALLATION INSTRUCTIONS INSTALLATION INSTRUCTIONS Surface Mount Tools • Drill and Drill Bit • Screwdriver • Pencil • Mounting Hardware (not included) NOTE: Mounting hardware (fasteners) not included. Mounting holes are 5/16" (7.9 mm) in diameter. To install the Bail Mount and unit: 1. Using the bail mount as a template, mark the location of the four mounting holes. Be sure to leave at least two inches of clearance behind the unit for the wiring. 2. Using an appropriate size drill bit, drill pilot holes for the fasteners. 3. Secure the bail mount to the surface with the fasteners. 4. Loosen the mounting knobs. 5. Slide the unit into the bail mount and tighten the mounting knobs. Mounting knobs Bail Mount Bail mount 4 GPSMAP 2006C/2010C & GPS 17
-
 1
1 -
 2
2 -
 3
3 -
 4
4 -
 5
5 -
 6
6 -
 7
7 -
 8
8 -
 9
9 -
 10
10 -
11
-
12
 |
 |
